In general, people find the need to ZIP Files in order to compress and reduce the file size, which helps in by-passing file upload size limitations set by Email and Messaging platforms.
If you are trying to send multiple files, you can combine them into a single zipped file, which reduces the complexity and hassle of attaching multiple files to WhatsApp or Email Message.
If the files contain personal information or sensitive data, they can be zipped, password protected and sent in an Encrypted format using third-party tools.
Zip and Unzip Files on Mac
You can find below the steps to Zip & Unzip Files on Mac using native or built-in File compression utilities that are available, right on your MacBook.
1. ZIP Files Using Right-click Menu
The easiest way to Zip files on Mac is by using the Compress option as available in the right-click menu.
1. Select the File/Files that you want to compress.
2. Once the Files are selected, right-click on the selected Files and select the Compress option in right-click menu.

You will see the compressed file appearing with a .zip extension and the original file will also remain on your Mac in its regular uncompressed format.
2. ZIP Files On Mac Using Archive Utility
Another way to Zip Files on Mac is to open Archive Utility and drag the File/Files that you want to compress into the Archive Utility Folder.
1. Click on the Search Icon located at top-right corner of the screen or Press (CMD + Space Bar) to launch Spotlight search bar.
![]()
2. Type Archive Utility in the Spotlight search bar and click on Archive Utility App in the search results. This will add the Green Archive Utility Folder to the Dock on your Mac.
![]()
3. Next, select the File that you want to compress and drag it into the Archive Utility Folder.
The Archive Utility will compress the added File and you will find it appearing next to the original uncompressed file.
Note: When you drag multiple files to Archive Utility the files will be compressed individually, they won’t be combined into a single compressed file.
3. Zip Folder on Mac Using Archive Utility
If you want to combine multiple files into a single compressed file, you can add them to Folder and drag the Folder containing multiple files into Archive Utility Folder.
1. Select the Files that you want to combine into a single compressed File.
2. Once the Files are selected, right-click on the selected files and select New Folder option in the right-click menu.

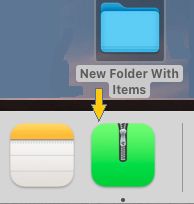
3. Once the New Folder containing multiple files is created, drag the Newly created Folder into the Archive Utility Folder located in the Dock.

The Archive Utility will compress the Folder and it will appear next to the original uncompressed folder.
How to Unzip Files on Mac?
If you have received a Zipped file, you can Unzip or uncompressed the Zipped file by using any of the following methods.
1. Double click: Simply double-click on the Zipped file and you will find it unzipping into uncompressed format.
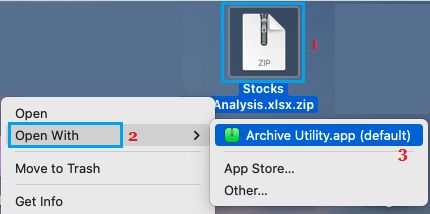
2. Right-click: Right-click on the Zipped File > hoover mouse over Open With and select Archive Utility.

3. Using Archive Utility: Open Archive Utility and drag the Zipped file in to the green Archive Utility Folder located in the Dock.
![]()
You will find the Zipped File converted into uncompressed format.