While WaasMedic.exe is a legitimate part of Windows operating system, it has also been associated with High CPU usage problems in both Windows 11 and Windows 10 computers.
In general, the main function of WaasMedic.exe is to ensure that updates being installed on the computer are not being interrupted, so that your computer can stay up-to-date with the latest operating system and security updates.
Hence, even if WaasMedic.exe is causing High CPU usage on the computer, it cannot be deleted or disabled, as it is an essential part of Windows and required for security and proper functioning of your device.
Fix: WaasMedic.exe High CPU Usage
You should be able to fix the problem of High CPU Usage by WaasMedic.exe on your Windows 11/10 computer by using the following steps.
1. Wait for CPU Usage to Go Down
It is normal for CPU Usage to go up while any process is running on the computer. Hence, you can wait for the WaasMedic.exe activity on your computer to be completed, after which the CPU usage should automatically go down.
If High CPU Usage by WaasMedic.exe is not coming down, even though you have waited long enough (15 to 30 minutes), you can try other troubleshooting methods as provided below.
2. Install Updates
The reason for High CPU Usage by WaasMedic.exe on your computer could be due to an update for your computer waiting to be downloaded and installed on your device.
Hence, a reasonable solution in this case would be to close all the open programs and browser tabs on your computer and manually check for updates and install them on your device.
1. Open Settings > click on Windows Update in the left-pane. In the right-pane, click on Check for Updates button.

2. Allow Windows to check for available updates and download them on your computer.
3. Pause Windows Updates
If you are going through a busy period and do not want your work to be impacted, you can pause updates on your computer for a few days to prevent WaasMedic activity.
1. Open Settings on your computer.
2. Click on Windows Update in the left-pane. In the right-pane, click on the down arrow next to Pause Updates and select your desired Pause Period.

Depending on your requirements, you can set the computer to delay or pause updates for 1 week, 2 weeks, 3 weeks and up-to a maximum period of 5 weeks.
4. Use Disk Cleanup App
Use the Disk Cleanup utility to remove the build-up of discarded, outdated and damaged temporary files which might be leading to High CPU usage on your computer.
1. Type Disk Cleanup in the Search bar > right-click on Disk Cleanup App and click on Run as Administrator.
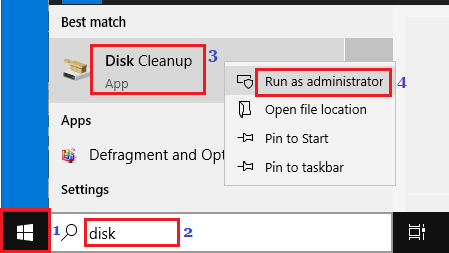
2. When prompted, enter your Admin Password and follow the instruction to remove all the suggested files.
5. Repair System Files Using SFC
The next step would be to rule out the possibility of the problem being caused due to corrupted system files.
1. Type Command Prompt in the search bar > right-click on Command Prompt App in the search results and click Run As Administrator option.
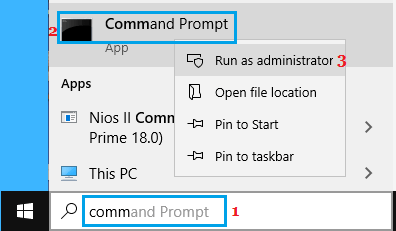
2. On Command prompt window, type sfc /scannow and press the Enter key on the keyboard of your computer.
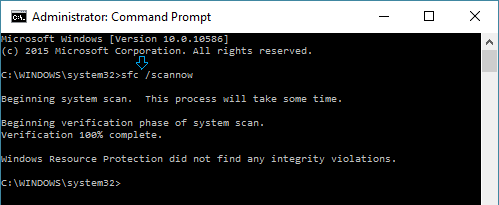
3. Restart your computer to see if the problem is fixed.
Patiently wait for Windows to scan your computer for System File Errors and fix them.