While the default setting in Windows is to allow OneDrive to automatically startup with the computer, it also provides the option to prevent OneDrive from opening at startup on your computer.
The reason for OneDrive being setup to start up automatically with the computer is to make it convenient for Users to store and access files stored on Microsoft’s popular cloud storage service.
While this default setting is ideal for automatically backing up Desktop, Documents & Photos and other Folders to OneDrive, it becomes unnecessary for those who are not using OneDrive.
Stop OneDrive from Opening at Startup in Windows 11/10
If you are interested, you can make use of the OneDrive pop-up to Sign-in to OneDrive by typing the Email Address linked to your Microsoft Account and this creates your OneDrive Account with 5 GB of free Cloud Storage.
If you are not interested in using any Cloud Storage service or using another Cloud Storage service, you can stop OneDrive from opening at Startup and even uninstall OneDrive from your computer.
1. Stop OneDrive from Starting Automatically
You can follow the steps below to prevent or stop OneDrive from starting up automatically on your Windows computer.
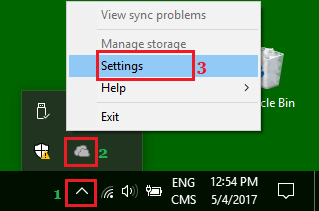
1. Click on System Tray icon located in the Taskbar > Right-click on OneDrive App icon and select Settings in the menu that appears.

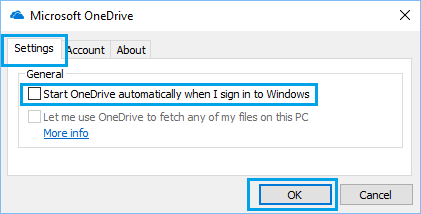
2. On the next screen, uncheck Start OneDrive automatically when I Sign in to Windows option and click on OK.

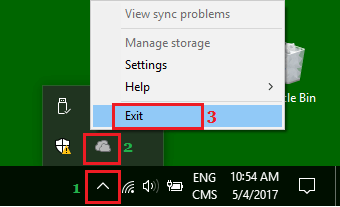
3. Next, click on the App Tray Icon again > Right-click on OneDrive Icon and select the Exit option in the menu that appears.

After this, you should no longer find the OneDrive App starting automatically on your computer.
2. Uninstall OneDrive from the Computer
If you are not at all interested in using cloud storage service, you can consider the option of uninstalling the OneDrive App from your computer.
You can find the steps to Uninstall OneDrive in this guide: How to Disable or Uninstall OneDrive in Windows 11/10.