If you are unable to experience the Spatial Audio feature on Mac, you can find below the steps to fix the problem of Spatial Audio not available or Greyed Out on Mac.

Spatial Audio Not Available on Mac
Apple’s Spatial Audio is designed to deliver 3D Audio Surround sound with dynamic head tracking feature on suppported Apple devices and selected 3rd party devices.
The overall impact of Spatial Audio is similar to Audio experienced in a Cinema, where you can feel the Audio coming from front, sides, rear, above and directly from actors as they move around.
Apple’s spatial audio feature makes use of accelerometeres and gyroscopes to track your head movement and the position of your device (iPhone, iPad or Mac) and automatically adjusts the sound direction as required.
1. Spatial Audio Not Working on YouTube and Amazon Prime
The most common reason for Apple’s Spatial Audio not being available on Mac is due to users trying to experience Spatial Audio on popular Apps like YouTube and Amazon Prime.
Unfortunately, Spatial Audio is not yet supported by YouTube, Amazon Prime and Spotify.
Apart from Apple TV & Apple Music, Spatial audio is supported by Netflix, Disney+, Discovery+, Hulu and certain other third-party Apps.
2. Check Processor Type
1. Click on Apple Logo in the top-menu bar and select About This option in the drop-down menu.

2. On the next screen, you will be able to see the type of Processor (Intel or Apple M1) installed on your Mac by taking a look at the Processor entry.
If the Processor entry contains the term “Intel”, your Mac is equipped with an Intel based processor and won’t be able to enjoy Apple’s Spatial Audio feature.
2. Check If Your Mac is Supported
1. Click on Apple Icon in the top-menu bar and select About This option in the drop-down menu.

2. On the next screen, the first entry will provide information about the Model of your Mac.
According to Apple, Spatial Audio is available and supported on the following models of Macs.
- M2 Chip Enabled Mac
- M1 MacBook Pro (2018 and later)
- M1 MacBook Air (2020 and later)
- M1 MacBook Pro (2020 and later)
- M1 iMac (2021 model)
- M1 Mac Mini (2020 and later)
3. Update macOS
A common reason for Spatial Audio not showing on supported Apple M1 Macs is due to the computer not being updated to the latest version of macOS.
1. Click on Apple Logo in top-menu bar and select About This Mac option.

2. On the next screen, click on Software Update and follow the instructions to install the Updates (if available).
Note: Spatial Audio appears to be available on macOS Monterey, macOS Ventura and later versions of macOS.
4. Check If Headphone is Supported
The next step is to make sure that your headphones support Spatial Audio. According to Apple, Spatial Audio is supported on the following models of headphones.
- AirPods (3rd generation)
- AirPods Pro, AirPods Max
- Beats Fit Pro, BeatsX, Beats Solo, Beats Studio3
- Beats Flex, Beats Solo Pro, Beats Studio Buds
- Powerbeats3 Wireless, Powerbeats Pro
In addition to above, Spatail Audio may also work on other Bluetooth headphones designated as headphones on iPhone or iPad.
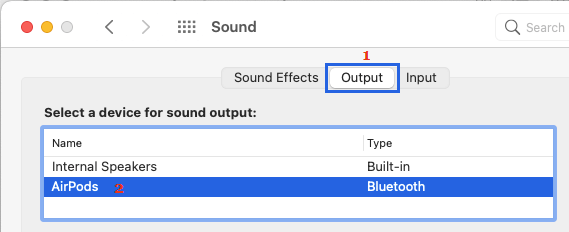
5. Make Sure AirPods/HeadPhones Are Selected
1. Click on Apple icon in top menu-bar and select System Preferences in the drop-down menu.

2. On the next screen, click on the Sound Icon.

3. On the Sound screen, switch to Output Tab and select your AirPods.

Note: Playing music can help, if you are using third-party headphones and not sure about their name on the Output screen.
6. Subscribe to Apple Music
Spatial Audio feature is available only if you are subscribed to the paid version Apple Music.
1. Open the Music App on your Mac.
2. Click on Try it Free option and follow the instructions to complete the Sign-up process.
Once you are Signed-up, you should be able to enjoy Apple’s Spatial Audio feature on supported tracks, during your 30 day free trial period of Apple Music.
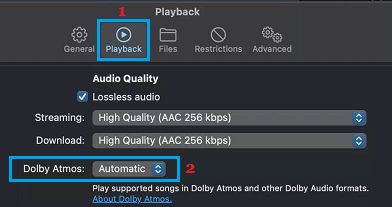
7. Enable Dolby Atmos in Apple Music
As mentioned above, Apple’s Spatial Audio feature works on top of Dolby Atmos. Hence, make sure that Dolby Atmos is enabled on your device.
1. Open the Music App on your Mac.
2. Click on the Music tab in the top-menu bar and select Preferences in the drop-down menu.

3. On Preferences screen, switch to Playback tab and make sure Dolby Atmos is set to Always On or Automatic option.

8. Enable Head Tracking Feature on Mac
1. Click on Control Center Icon, located at top-right corner of the screen and select Sound in the Control Center menu.
2. On the Sound screen, click on the down Arrow next to your AirPods and make sure Head Tracked option under “Spatial Audio” section is selected.
![]()
Head Tracking Option Not Showing in Spatial Audio
1. Click on the Music tab in the top-menu bar and select Preferences in the drop-down menu.

2. From the Preferences screen, go to Accessibility > Audio > move the toggle next to Spatial Audio follows head movements to ON position.
After this, Head Tracking Option should be available for selection on your Mac.