While you can project Computer Screen to TV using Miracast, you will be amazed at how easy it is to project media from Computer to TV using Google’s Chromecast device.
All that is required to use Google Chromecast on a Windows 11/10 computer is to plug the Chromecast device to the HDMI port of Home TV and setup Chromecast by using Google Home App installed on a mobile device.
Once the setup process is completed, you will be able to cast YouTube, Movies and TV programs playing on the computer to the large screen of your Home Television.
Use Chromecast On Windows Computer
As mentioned above, the first step is to attach the Chromecast device to the HDMI port of your Television and the next step is to complete the steup process, which needs to be completed on a mobile device.
Once the setup process is completed, a mobile device is no longer required and you will be able to cast media directly from your computer to TV.
Step 1. Plug Chromecast Device to Computer
Follow the steps below to attach the Chromecast device to the HDMI port of TV.
1. Plug the HDMI End of Google Chromecast device into the HDMI port of your Home TV and plug the USB End to the USB power adapter.
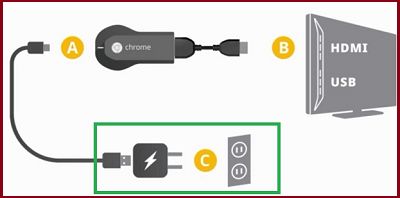
2. Next, use the Remote Control of your Television to change the Source input of TV to the right HDMI Port into which the Chromecast device is plugged in.
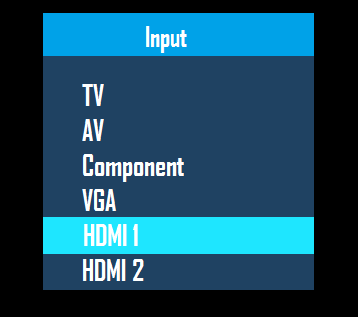
Note: On most Remote Controls you will be required to press “Input” or the “Source” button and select the HDMI port into which the Chromecast device is plugged-in (HDMI 1, HDMI 2…)
Step 2. Setup Chromecast Using Google Home App
The next step is to setup the Chromecast device by using Google Home App, which needs to be downloaded on a mobile device.
1. Download the Google Home App on your Android Phone from Google Play Store. If you are using iPhone, download Google Home App from the App Store.
2. Once the App is downloaded, tap on the Install option and follow the instructions to complete the Installation process.
3. Open Google Home App > tap on Get Started button > on the next screen, select your Google Account and Agree to terms and conditions by tapping on I Agree.
4. When prompted, allow Google Home to use your Wi-Fi and Bluetooth Networks by tapping on the Allow option.
5. On Choose a Home screen, select an existing Home or Create/Add Another Home and tap on Next.
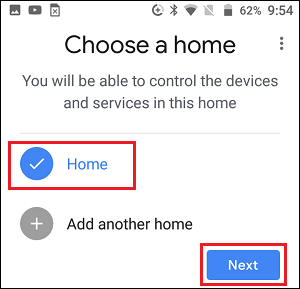
Note: If you select Add Home option, you will be prompted to type Name for your Home and tap on Next.
6. Wait for the Home App to locate your Chromecast device. Once that is done, tap on the Yes button.
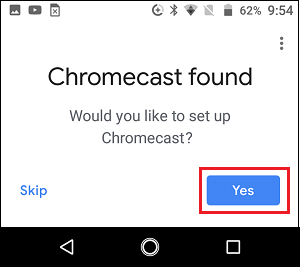
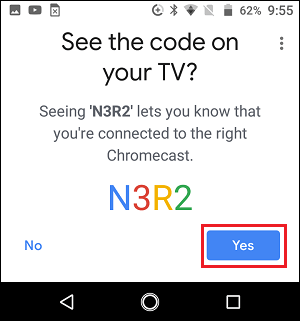
7. You should now see a Code on Phone & TV screen. If the Code on Phone matches with that on TV, tap on the Yes button.
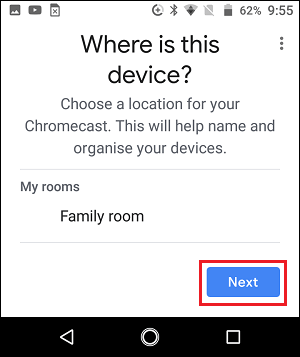
8. On the next screen, select a Location for your Chromecast Device and tap on Next.
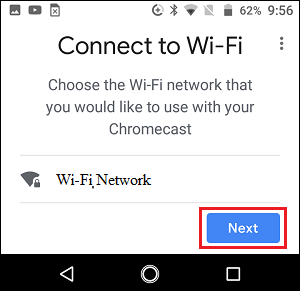
9. On Connect to Wi-Fi screen, select your Wi-Fi Network and tap on Next.
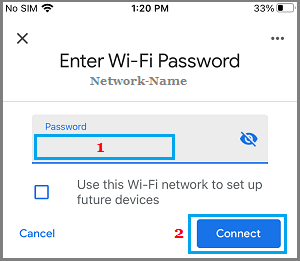
10. Enter the Password for your Wi-Fi Network, tap on Connect and follow the next instructions to complete the setup process
After completing above steps, you are all setup and ready to project YouTube Videos, Netflix Movies and other media playing on your Windows 10/11 computer to TV.
3. Project Media from Windows Computer to TV
Once the Chromecast Device is setup and connected to Wi-Fi network, it will be able to recognize all your mobile devices and computers connected to your Home Wi-Fi Network.
Now, when you open YouTube or any other App that supports Chromecast on your Windows computer, you will see a Cast Icon on the video, movie or program that is playing on your computer.
All that is required to project the video or movie from your computer to the large screen of your Home TV is to click on the Cast Icon that appears on the video.
![]()
Within a few seconds, you will the find the video/movie or playing on the screen of your Home Television.
After the video/movie starts playing on the TV, you are free to use any other app or program on your computer. The video/movie will continue to play on the TV screen, even if the computer goes to sleep.