Users affected by High RAM and CPU Usage by Runtime Broker have reported noticing as much as 50% CPU and 1 GB RAM being used by Runtime Broker on their computers.
Microsoft recommends that you terminate the Runtime Broker process, if this Windows service is using more than 15% of the memory on your computer.
Fix High CPU Usage by Runtime Broker
As mentioned above, you can easily terminate the Runtime Broker Process on your computer by using Task Manager and this should bring down the CPU Usage on your computer.
If the problem keeps re-appearing, you can significantly reduce the Runtime Broker activity on your computer by disabling certain Windows features as provided below in this guide.
1. Stop Runtime Broker Process Using Task Manager
You can immediately bring down the CPU usage on your computer by terminating Runtime Broker process using Task Manager.
1. Right-click on the Start button and click on Task Manager.
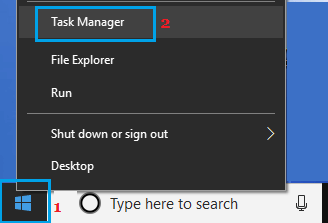
Note: You can also use Ctrl-Shift-Esc shortcut to open Task Manager.
2. On the Task Manger screen, right-click on Runtime Broker and click on End Task.
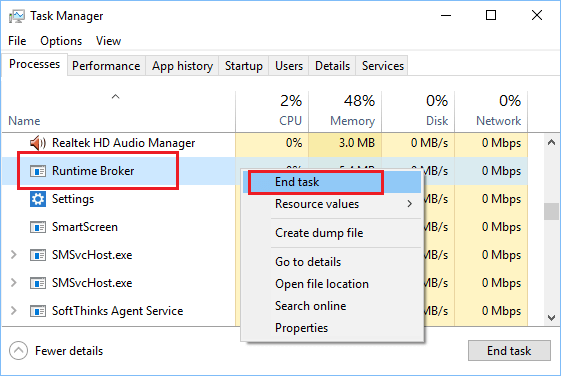
As mentioned above, terminating Runtime Broker using Task Manager is a temporary solution.
Runtime Broker will once again launch itself when you restart the computer and start using Windows Apps.
2. Uninstall Faulty Apps
According to Microsoft, Runtime Broker usually causes high CPU Usage due to presence of incompatible or faulty Apps on the computer.
If you are noticing High CPU Usage after installing a particular App, you can uninstall the App and see if the problem goes away.
3. Disable Get Tips & Tricks
While getting Tips & Tricks from Microsoft can be useful, it can lead to High CPU Usage by Runtime broker.
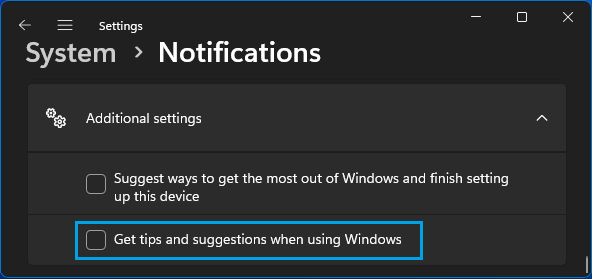
Windows 11: Go to Settings > System > Notifications > scroll down and tap on Additional Settings. On the next screen, uncheck Get tips and suggestions when using Windows option.
Windows 10: Go to Settings > System > click on Notifications & Actions in the left-pane. In the right-pane, disable Get tips, tricks, and suggestions as you use Windows option.
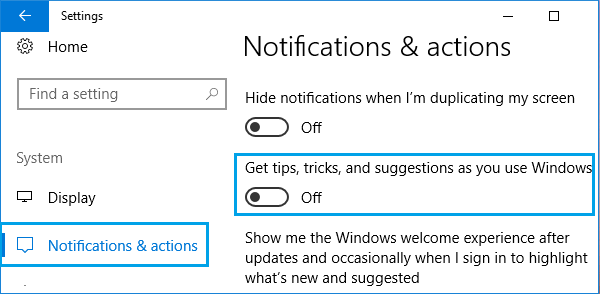
Users have reported significant reduction in Runtime Broker activity after making this single change on their computers.
4. Disable Downloads from other PCs
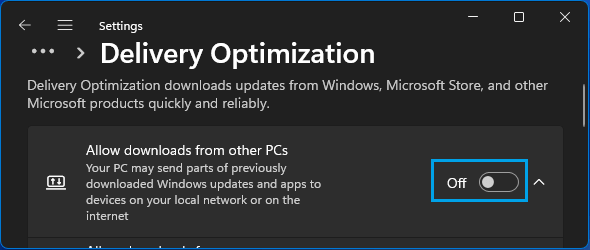
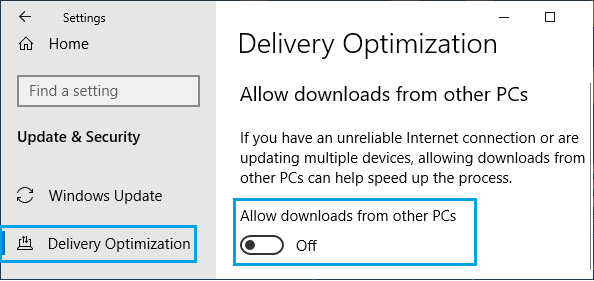
In order to deliver timely updates, Microsoft provides the option to allow downloads from other PCs on the Network and internet. However, this feature can often lead to High Runtime Broker activity.
Windows 11: Go to Settings > Windows Update > Advanced Options > Delivery Optimization > on the next screen, disable Download from other PCs option.
Windows 10: Go to Settings > Updates & Security > click on Delivery Optimization in the left-pane. In the right-pane, scroll down and disable Download from other PCs option.
Restart the computer to apply this change.
5. Disable Background Apps
The high CPU Usage on your computer might be due to certain background running apps requiring Runtime broker activity.
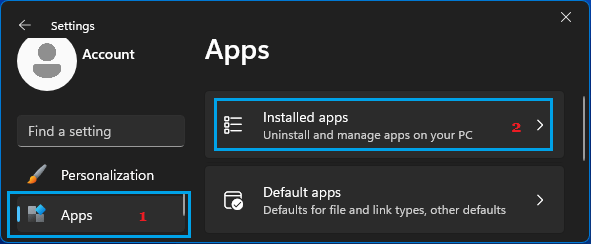
1. Go to Settings > Apps > click on Installed Apps in the right-pane.
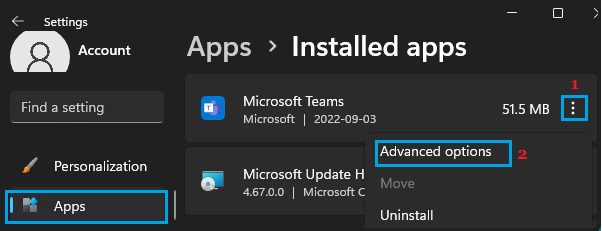
2. On Installed apps screen, click on 3-dots icon next to the background running app and click on Advanced options.
3. Next, scroll down to “Background App Permissions section” and set Let this App Run in Background to Never.
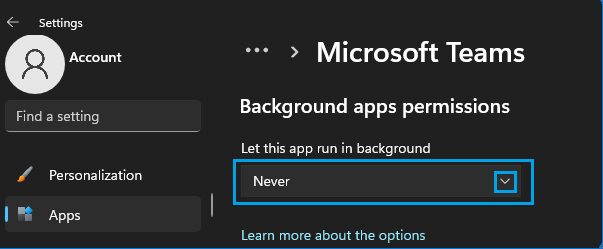
4. Repeat the above steps for other background running apps.
Windows 10: Go to Settings > Privacy > Background Apps > Disable Let apps run in the background option.