If the USB Drive has become corrupted and preventing you from accessing files, you can find below the steps to Recover Files from Corrupted USB Flash Drive.
Recover Files from Corrupted USB Flash Drive
USB Drives also known as Flash drives or Pen drives are popular due to their portability, low price, large storage capacity and the ability to transfer data.
However, USB Flash Drives are known to suddenly stop working, become unreadable, fail to get recognized or become inaccessible due to file system corruption and other reasons.
Why Flash USB Drives Get Corrupted?
In general, USB Drives can get corrupted due to any of the following reasons.
1. Abruptly Removing: Removing USB Flash Drive from the computer while it is still in the process of reading or writing data can lead to corruption of the Flash Drive.
2. Removing Before Ejecting: USB Flash drive can get corrupted, if it is pulled out from USB Port, without being Ejected.
The right or proper way to disconnect USB Flash Drive from the computer is to right-click on the USB Icon and select the Eject option.
3. Sudden Power Loss: USB Flash drive can get damaged or corrupted, if the computer is abruptly shut down, while it is still in the process of transferring data to USB Flash Drive.
4. Malware: Any File or Firmware in the USB Drive gets infected by malware.
5. File System Corruption: Damage to the File System can make the USB Flash Drive inaccessible.
6. Flash Memory Wear: There is a limit to read/write cycles or number times data can be overwritten on the same location.
Is it Possible to Recover Files from Corrupted USB Flash Drive?
Unless the USB Drive is not physically damaged, you should be able to Recover Files from a corrupted USB Flash Drive using the following methods.
1. Uninstall USB Device
If the USB Storage Drive is not at all being recognized, the problem could be due to the device driver software not being properly loaded.
1. Right-click on the Start button and click on Device Manager.
2. On Device Manager screen, right-click on Unknown Device and click on Uninstall Device option.
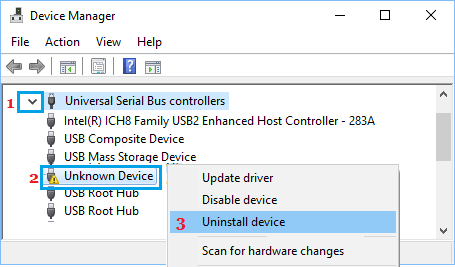
3. Restart the computer and Windows should automatically reinstall the right driver for the Flash Drive.
2. Check USB Drive for Errors
As mentioned above, USB Flash Drives can stop functioning and become inaccessible due to File System Errors.
1. Open the File Explorer on your computer.
2. On the File Explorer screen, right-click on the USB Drive and select Properties.
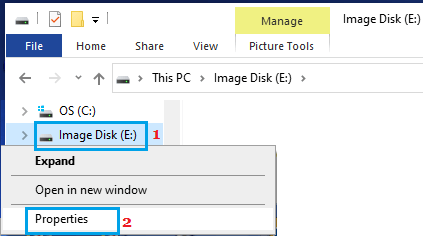
3. On the next screen, switch to Tools Tab and click on the Check button.
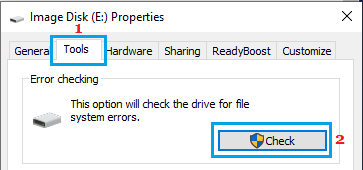
4. On the next screen, click on Repair Drive and allow the computer to repair errors on the USB Flash Drive.
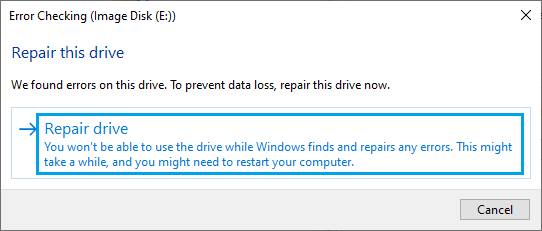
After the repair process is completed, you should be able gain access to files in your USB Flash Drive.
Note: If you are prompted to format the USB Drive, do not select the Format option.
3. Assign Drive Letter
In certain cases, the problem is due to USB Drive letter not being assigned or improperly assigned by the computer.
1. Right-click on the Start button and click on Disk Management option.
2. On Disk Management scree, right-click on the Flash Drive and select Change Drive Letter and paths.. option.
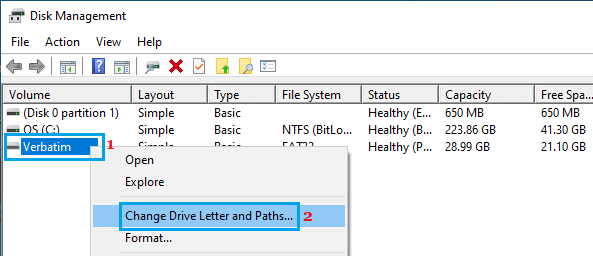
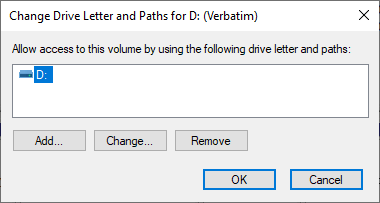
3. On the pop-up, click on the Change option.
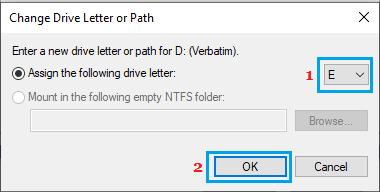
4. On the next screen, select Assign the following drive letter option > Assign a New Drive Letter using the drop-down and click on OK.
4. Close the Disk Management screen and open File Explorer to see if the USB Flash Drive is now showing up or accessible.
4. Use Command Prompt
1. Type Command Prompt in the Search bar > right-click on Command Prompt and select Run as Administrator option.
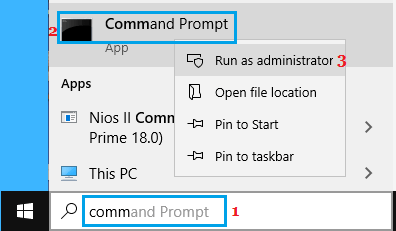
2. In the Command prompt window, type chkdsk E: /f and press the Enter Key – (Replace E: with your USB drive letter).
Once the process is complete, right-click on the USB Drive Icon and select the Eject option. Unplug the USB drive from the computer and Plug it back again.