A common reason for iPhone not uploading Photos to iCloud is due to iPhone being in Low Power Mode. In-fact, iPhone is also known to suspend photo upload to iCloud if the Battery goes below 50%.
In addition to above, the problem of iPhone not uploading photos to iCloud is known to occur due Lack of iCloud Storage Space, Network related issues, Apple’s iCloud Service being busy and other reasons.
Phone Not Uploading to iCloud from iPhone or iPad
If your iPhone or iPad is struggling or taking a long time to upload Photos to iCloud, you should be able to fix the problem using the following steps.
1. Check Network Strength
The most common reason for iPhone struggling to upload photos to iCloud is due to poor network connectivity. Hence, start by checking the current signal strength on your device.
![]()
If the reception is poor, re-start the Router and this should help in fixing the WiFi Network connectivity problems on your device.
2. Check Battery Level
As mentioned above, iPhone has a default tendency to slow down or pause uploads/downloads, if the battery level goes below a certain level.
Hence, the most practical soloution in this case is to connect your iPhone for charging and you should find your device starting to upoad photos to iCloud, once the Battery Level goes above 50%.
3. Make Sure iCloud Photos is Enabled
The problem could be due to iCloud Photos being accidentally disabled on your device.
1. Go to Settings > Photos.
2. On the next screen, make sure iCloud Photos is enabled.

After this, you should find your iPhone automatically uploading to iCloud, whenever it is connected to a Wi-Fi network.
4. Check iCloud Storage Status
A common reason of Photos not uploading to iCloud is due to lack of iCloud Storage Space.
1. Go to Settings > Apple ID > iCloud.
2. On the next screen, you will be able to see the status of Storage in your iCloud Account.
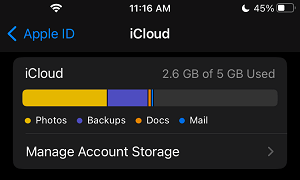
If there is insufficient storage space, you can either make efforts to free up storage space in your iCloud Account or buy additional iCloud storage by going to Manage Account Storage > Change Storage Plan.
5. Sign Out of Apple ID
In certain cases, the problem is due to your Apple ID not being recognized by iCloud.
1. Open Settings > tap on your Apple ID Name.
2. On Apple ID screen, scroll down and tap on the Sign Out option.

3. Follow the instructions to Sign out from iPhone.
4. After 30 seconds > Sign-in back into your device and see if the problem is now fixed.
6. Check Local Storage Status
If the Local Storage Space on iPhone is insufficient, it can create problems while uploading photos to iCloud.
1. Go to Settings > General > iPhone Storage.
2. On the next screen, take a look at the status of storage space on your iPhone.

If the remaining storage space on your device is less than 2 GB, you need to make efforts to Free Up Storage Space on your device.
7. Check iCloud Service Status
The problem could be due to Apple’s iCloud Service being down or experiencing problems. You can rule out this possibility by going to Apple’s System Status page.
On this page, Apple provides a complete list of all its services and their current status of service (Available or Unavailable).
8. Use Cellular Data to Upload Photos to iCloud
The default setting on iPhone is to upload photos to iCloud using Wi-Fi. If you are not connected to Wi-Fi, you need to enable cellular data for photos.
1. Go to Settings > Photos > Cellular Data.
2. On the next screen, move the slider next to Cellular Data and Unlimited Updates to ON position.

This allows iPhone to automatically upload photos to iCloud using cellular data, whenever Wi-Fi Network is not available.
Note: If you are on a Limited Data Plan, enabling Cellular Data for Photos App can end up being expensive.