In general, the problem of Google Chrome coming up with “Not Enough Memory to Open This Page” message is noticed on budget computers that are equipped with low RAM capacity.
In another variation of this error, users have reported Google Chrome coming up with “Google Chrome ran out of memory, while trying to display this page” error message.
In most cases, this problem can be fixed by making changes to default Google Chrome browser settings and by allocating additional virtual memory on your Windows 11/10 computer.
Not Enough Memory to Open This Page in Google Chrome
You can find below the steps to fix “Not Enough Memory to Open This Page” error message on a Windows 11/10 computer.
1. Close Browser Tabs
The easiest way to free up resources on a Windows computer is to close browser tabs and programs that are not currently being used on your computer.
After closing idle browser tabs and programs, you should be able use Google Chrome without encountering any error messages.
2. Clear Cache and Cookies
Clearing the browser Cache should help in improving the performance of Google Chrome on your computer.
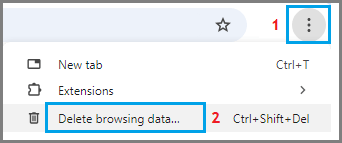
1. Open Google Chrome > click on 3-dots menu icon > select Delete Browsing Data option in the drop-down menu.
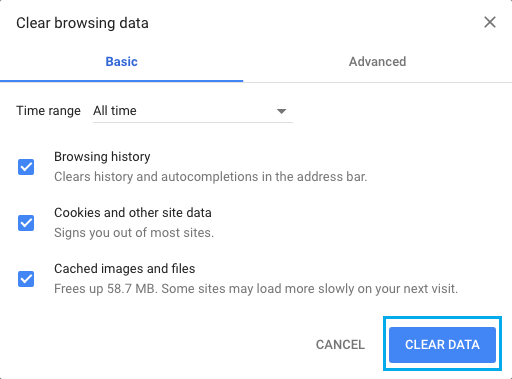
2. On the next screen, select All Time as the “Time Range”, check Browsing History, Cookies, Cached Images and click on Clear Data button.
3. Disable Browser Extensions
Incompatible browser extensions can lead to program conflicts and cause high resource usage.
1. Open the Google Chrome browser on your computer.
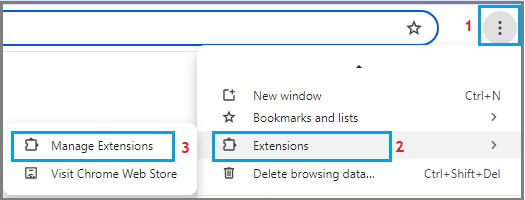
2. Click on 3-dots menu icon > Hoover mouse over Extension > click on Manage Extensions.
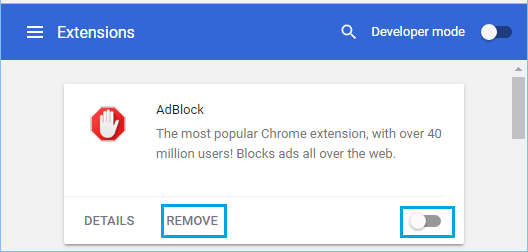
3. On the next screen, disable all extensions by moving the toggle to OFF position. If an extension is unnecessary, click on Remove to uninstall the extension.
4. Restart Chrome browser and see if you are still getting Not Enough Memory message.
4. Disable Hardware Acceleration
The Hardware Acceleration feature in Chrome Browser is known to cause problems on computers with low RAM Capacity.
1. Open Google Chrome > click on 3-dots Icon and select Settings in the drop-down menu.
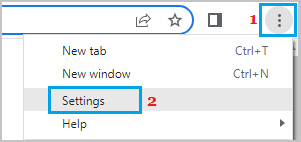
2. On the Settings screen, select System in the left-pane. In the right-pane, disable Use hardware acceleration when available option.

3. Restart the browser and see if you are able to load the webpage.
5. Prevent Chrome from Running Apps in Background
Follow the steps below to prevent Google Chrome from allowing plugins and browser extensions to run in background.
1. Open Chrome browser > click on 3-dots Icon and select Settings in the drop-down menu.

2. On the Settings screen, select System in the left-pane. In the right-pane, disable Continue running background apps when Google Chrome is closed option.
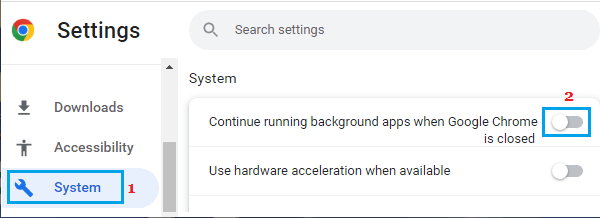
This will prevent the browser from running Chrome processes in background on your computer.
6. Increase Virtual Memory
Increasing the virtual memory on a computer allows Windows to use virtual memory (paging file), whenever there is a shortage of RAM on the computer.
1. Right-click on the Start button and click on Run.
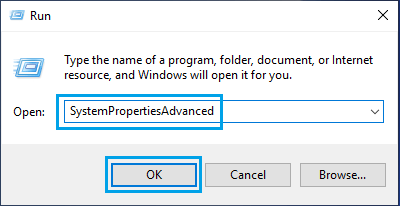
2. In the Run Command window, type SystemPropertiesAdvanced and click on OK.
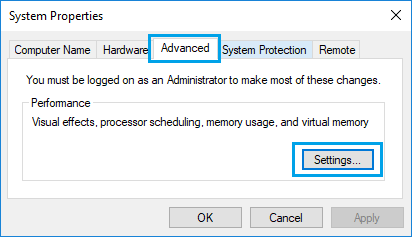
3. On System Properties screen, switch to Advanced tab and click on the Settings button, located under “Performance” section.
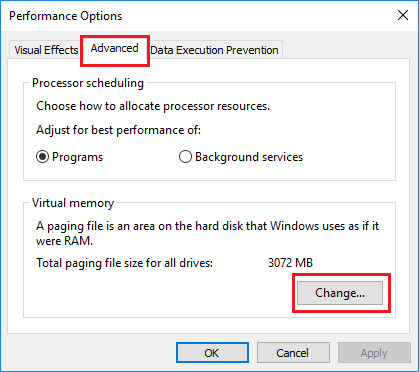
4. On Performance Options screen, switch to Advanced tab and click on the Change button, located under Virtual Memory section.
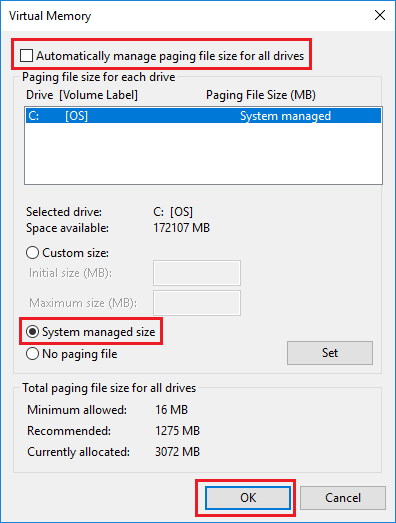
5. On Virtual Memory screen, uncheck Automatically manage option, select the Drive, select System Managed size and click on OK.
Make sure you Restart the computer for above changes to be implemented.