If you cannot hear any sound while playing a Movie or TV Show on Netflix on a Windows computer, the problem could simply be due the TV or the streaming device going through a minor glitch.
Apart of this, the reason for lack of sound on your computer while watching a movie on Netflix could be due incorrect audio settings, the Netflix app not being updated and other reasons.
Fix: No Sound on Netflix Issue in Windows 11/10
Before going ahead with the steps to fix the issue of No Sound in Netflix on your computer, make sure that the volume level is turned up on the computer and also in the Netflix player.
If this did not help, you should be able to fix the Netflix Sound problem on your computer using the following troubleshooting steps.
1. Restart the TV
In many cases, the problem is due to the Smart TV, Chromecast or other Streaming Device going through minor problems.
This can be fixed by Restarting the device, which helps in closing stuck processes and clearing the cache.
2. Check Connections
Take a close look at the HDMI cable and the internet cable (in case of wired internet) and make sure that both HDMI cable and other connections are properly plugged in.
3. Close Unused Apps and Browser Tabs
The performance of Netflix on Windows 10/11 computer depends on the amount of memory and processing resources that are available on the computer for streaming of Netflix videos.
Hence, free up as much resources as possible by closing all Unused Apps and browser tabs on the computer.
4. Change Audio Settings
Sometimes, the problem of Sound Not Playing in Netflix is due to the video being set to a sound settings that is not supported by the computer.
1. Open the Netflix App on your computer and Start Playing any Movie or TV Show on Netflix.
2. While the video is playing, move your mouse over the screen and click on the Dialogue icon.
![]()
3. On the menu that appears, see if surround sound (5.1) is selected. Try changing it to any available non-5.1 option.
After this change, try playing a Movie on Netflix and see if you can hear the Audio clearly.
5. Set Audio to Studio Quality
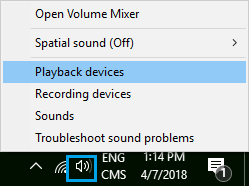
1. Click on the Speaker icon in the taskbar (right corner) and click on Playback devices.
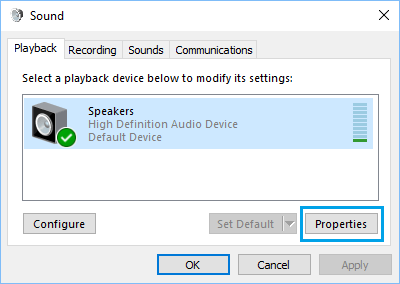
2. On the next screen, click on the Playback tab > Speakers > Properties.
3. On Speaker properties screen, switch to Advanced tab and select 24 bit, 192000 Hz (Studio Quality) sound.
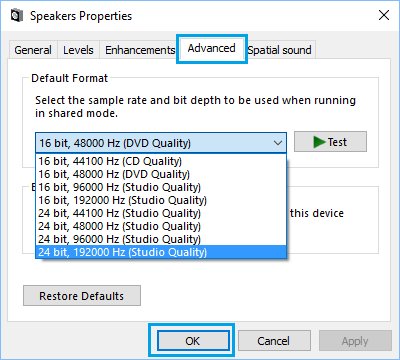
4. Click on OK to save this setting.
Now, play a video on Netflix and see if you can hear the sound.
6. Install Updates
Netflix makes use of Microsoft Silverlight, so make sure that you have the latest version of Microsoft Silverlight installed on your computer.
1. Click on the Start button > click on Settings Icon in the start menu.
2. Select Windows Update in the left-pane. In the right-pane, click on Check for Updates button.
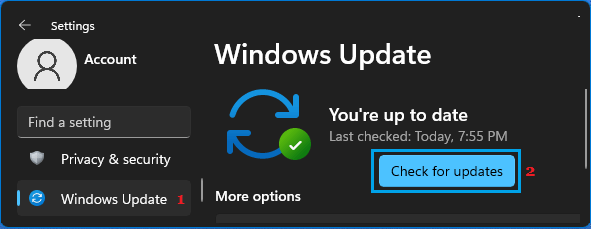
3. Allow Windows to check for updates and follow the instructions to download and Install Updates (If available).
Windows 10: Go to Settings > Updates & Security > select Windows Update in the left-pane and click on Check for Updates button in the right-pane.
7. Reinstall Audio drivers
The problem of No Sound in Netflix on your Windows computer might be related to the device driver for sound controller being damaged or corrupted.
1. Right-click on the Start button and select Device Manager.
2. On Device Manager screen, right-click on the device listed under “Sound, Video and Game controllers” and select Uninstall device option in the contextual menu.
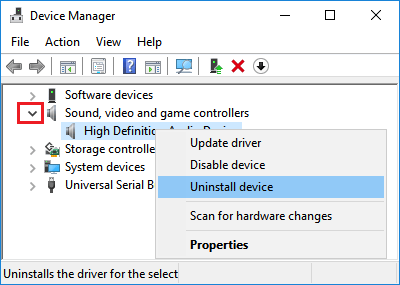
3. Restart the computer.
Once the computer restarts, Windows should automatically install the right device driver.
8. Switch Audio Output to HDMI
HDMI connection transmits both Video and Audio signals within a single cable. If the Audio Output setting on your computer doesn’t change to HDMI output automatically, you’ll have to switch it manually.
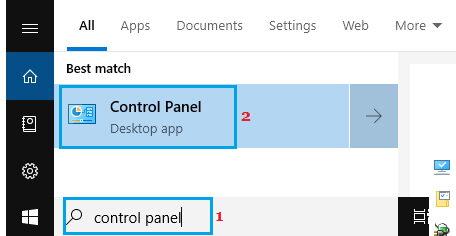
1. Type Control Panel in the Search bar and click on Control Panel Desktop App in the search result.
2. On Control Panel screen, click on Hardware and Sound > Manage Audio Devices.
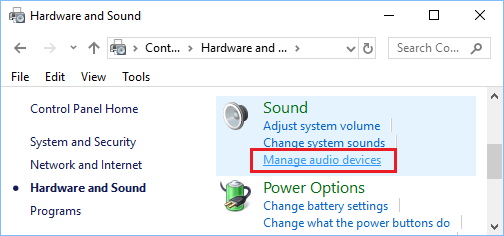
3. On the next screen, set HDMI or Digital Audio as the Default Audio Device.