If you find that the Battery of your Laptop drains in sleep mode, especially when Lid is closed, the problem is usually due to the Lid closing action not being associated with sleep mode or power saving option.
Once the Lid Closing Action is associated with sleep mode or some other power saving option, you should notice a considerable improvement in the Battery Life of your Laptop.
Another common reason for this issue is due to Fast Startup being enabled by default on most Windows 11/10 Laptops.
While “Fast Startup” is designed to provide quick access to recently opened files, it can sometimes cause problems by preventing the computer from shutting down properly.
Laptop Battery Drains in Sleep Mode
If the Battery of your Laptop computer drains in sleep mode, especially even its Lid is closed, you can find below the steps to fix the problem.
1. Configure Laptop Lid Closing Action
Follow the steps below to make sure that the Lid closing action on your Laptop is associated or linked to sleep mode.
1. Right-click on the Start button and click on Run.
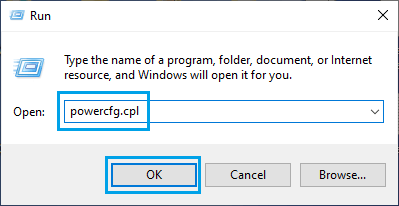
2. In the Run Command window, type powercfg.cpl and click on OK.
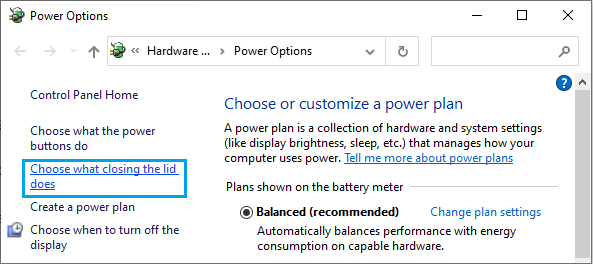
3. On Power options screen, click on Choose What Closing the lid does link in the left-pane.
4. On the next screen, set ‘When I Close the lid‘ setting under ‘Battery’ & ‘Plugged in’ to Sleep.
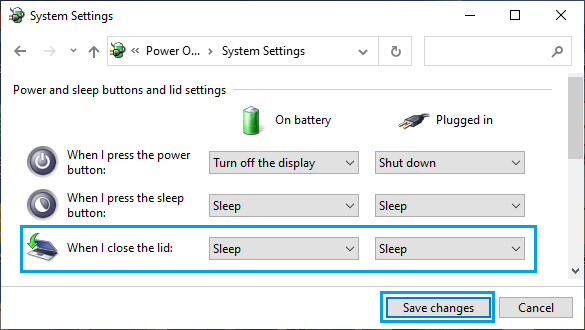
5. Click on Save Changes to save this setting on your computer.
After this, you should no longer find the Laptop Battery draining faster when its Lid is closed in sleep mode.
2. Disable Fast Startup
1. Right-click on the Start button and click on Run.
2. In Run Command window, type powercfg.cpl and click on OK.

3. On Power options screen, click on Choose What the Power Buttons Do link.
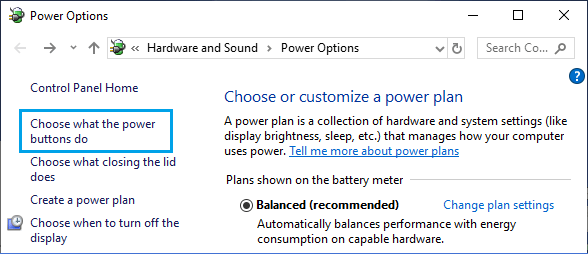
4. On the next screen, scroll down to “Shutdown Settings” and uncheck Turn on fast startup option.
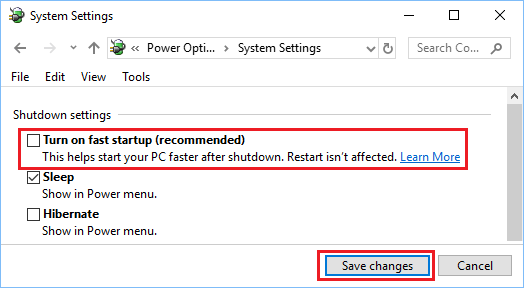
5. Click on Save Changes button.
3. Check Battery Health
If you are still noticing Battery Drain in Sleep Mode, the problem might be due to poor health of the battery installed on your Laptop.
You can confirm this by generating a Battery Health Report on your computer checking the current current health status of the battery installed your laptop.
1. Type PowerShell in the search bar, right-click on Windows PowerShell in the search results and click on Run as administrator option.

2. Type powercfg / batteryreport in the PowerShell window and press the Enter Key to generate battery health report on your computer.

3. After this, open the File Explorer on your computer.
4. From the File Explorer screen, navigate to C:\Windows\System32\battery-report.html to view the Battery Report for your Laptop.
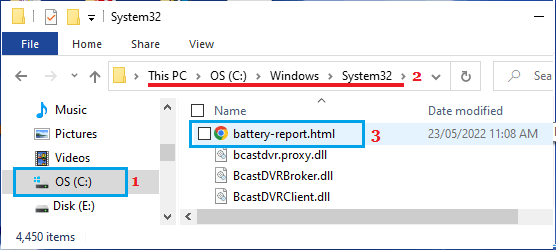
The Battery Report will provide information about the the Designed and Full charge capacity of the Battery installed on your Laptop.
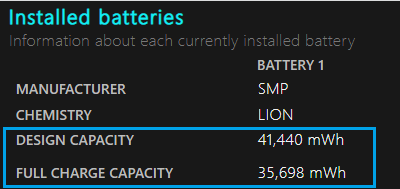
If you see a big difference between Designed & Full Charge capacity, it is time to replace the battery installed on your Laptop.