Here is a look at “Windows Shell Experience Host”and the steps to fix High CPU Usage by Windows Shell Experience Host in Windows 11/10.
What is Windows Shell Experience Host?
Windows Shell Experience Host is a legitimate part of Windows operating system and not a virus or a malware program, trying to damage the computer or steal your data.
The main task of Windows Shell Experience Host is to handle graphical elements or the display part of universal apps on installed on the computer.
For example, the graphical interfacing of the Start menu, Taskbar, Notification area visuals (clock, calendar, etc) and changing of the desktop background are handled by Windows Shell Experience Host.
Windows Shell Experience Host Causing High CPU Usage
In normal cases, Windows Shell Experience Host should only consume about 5 to 7% of CPU, whenever it is required to handle the graphical elements in Apps, after which it should quickly settle back to zero.
However, if you frequently notice Windows Shell Experience Host consuming high amount of CPU (25% to 35%) and memory on your computer, the problem can be fixed using the following steps.
1. Install Updates
The first step is to make sure that your computer is upto-date with latest version of Windows OS.
1. Open Settings > click on Update & Security Icon.
2. On the next screen, click on Windows Update in the left-pane. In the right-pane, click on Check for updates button.
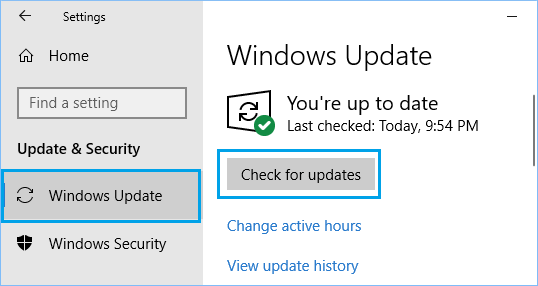
Allow the computer to check for Updates and Install the Updates on your computer (in case they are available).
2. Change Desktop Background
The most common reason for High CPU Usage by Windows Shell Experience Host is reported to be slideshow background and many users have reported fixing the problem by switching to solid colour or picture background.
1. Open Settings > click on Personalization Icon.
2. On the next screen, select Background in the left-pane. In the right-pane, use the down-arrow to change the background type to either Picture or Solid Colour.
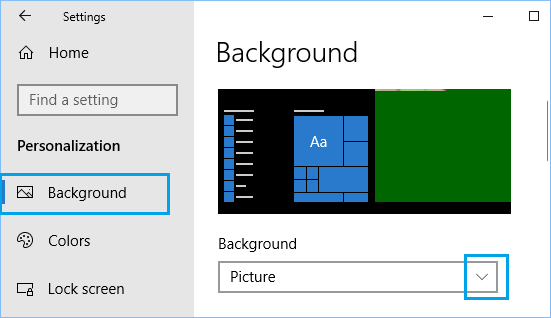
3. Make sure that you Restart the computer and see if the problem of High CPU Usage by Windows Shell Experience Host is fixed on your computer.
3. Turn off Automatic Background Color Changing
The next solution is to disable the option to automatically change the Background colour on your computer.
1. Open Settings > click on Personalization Icon.
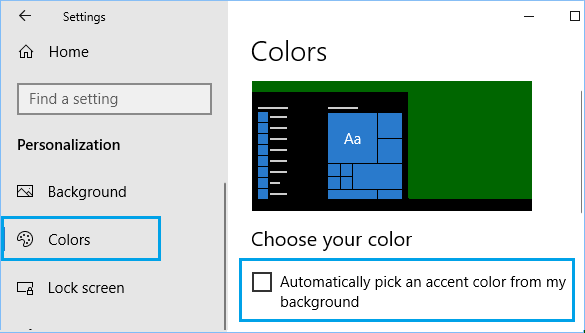
2. On the next screen, select Colors in the left-pane. In the right-pane, uncheck Automatically pick an accent color from my background option.
4. Reduce Transparency Effects
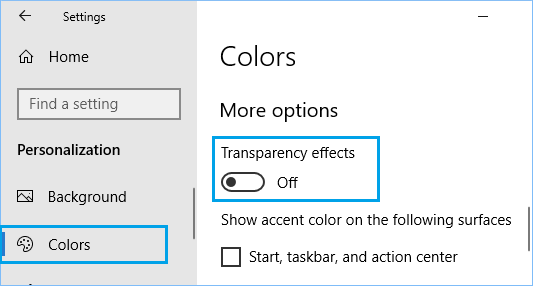
Since, Windows Shell Experience Host is also responsible for transparency effects for the Start menu, Taskbar, Action Center and other menus, disabling transparency effects can help in fixing the problem.
1. Open Settings > click on Personalization Icon.
2. On the next screen, click on Colors in the left-pane. In the right-pane, move the toggle below Transparency effects to OFF position.
4. Run SFC Command
Lastly, Run SFC Command to rule out the possibility of High CPU Usage being caused by corrupted or deleted System Files on your computer.
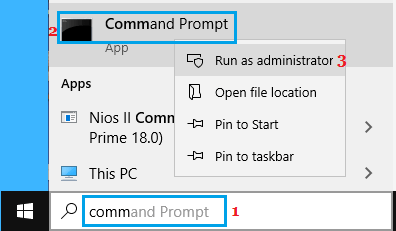
1. Type Command Prompt in the search bar > right-click on Command Prompt App in the search results and click on Run as Administrator option.
2. On the Command prompt window, type sfc /scannow and hit the enter key on the keyboard of your computer.
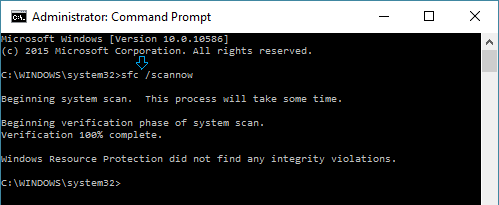
3. Patiently wait for the SFC command to be completed and Restart the computer.