You can automatically forward emails landing in your Outlook Mail Account to Gmail or any other email address. In-fact, you can even set up Inbox rules to forward Outlook Mail to another email address, only if certain conditions are met.
The mail forwarding feature in Microsoft Outlook can be useful, in case you have switched to a new email address and want to make sure that emails addressed to your old email address are available in your new email account.
As mentioned above, it is not necessary for the forwarding email address to be another Outlook email address. You can forward Emails from Outlook to Gmail and almost all other popular Email Clients.
Note: Due to increase in security measures by email servers, you may find certain messages sent to the forwarding email address landing in the spam folder.
1. Forward Outlook Mail to Another Email Address
You can find below the steps to setup simple mail forwarding in Outlook to forward all incoming emails to your new email address.
1. Click on Settings Icon located at top-right corner and select Options in the drop-down menu.
![]()
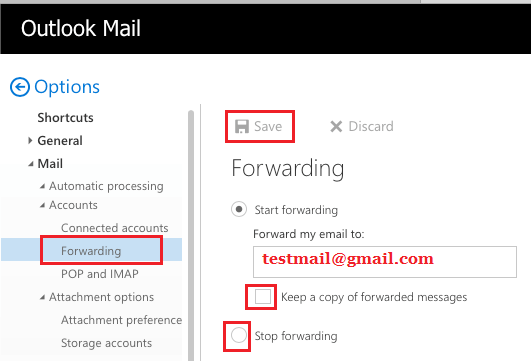
2. On Mail Options screen, click on Forwarding in the left-pane. In the right-pane, select the Start Forwarding option and enter the Email Address to which you want to forward emails.

You can check “Keep a copy of forwarded messages” option, in case you want a copy of forwarded messages in your current Outlook email account.
3. When you are done selecting, click on Save.
2. Forward Outlook Mail From Specific Senders to Another Email Address
As mentioned above, you can setup Inbox Rules in Outlook to forward only Emails from certain senders or Emails matching a certain criteria to another email address.
For example, you can setup Outlook to automatically forward emails from Facebook, Twitter and other Social Media accounts to another email address.
1. Click on the Settings icon located in the top menu bar and select Options in the drop-down menu.
![]()
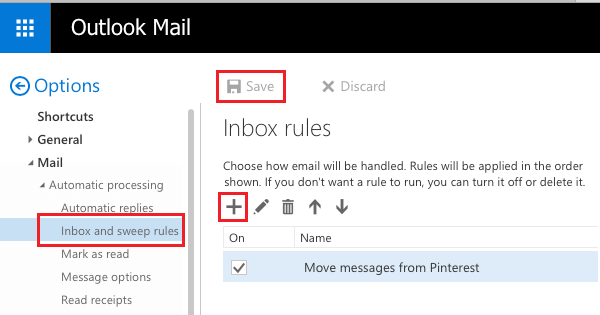
2. On the Options screen, select Inbox and sweep rules in the left-pane. In the right-pane, click on the + icon (plus sign) located under Inbox rules.

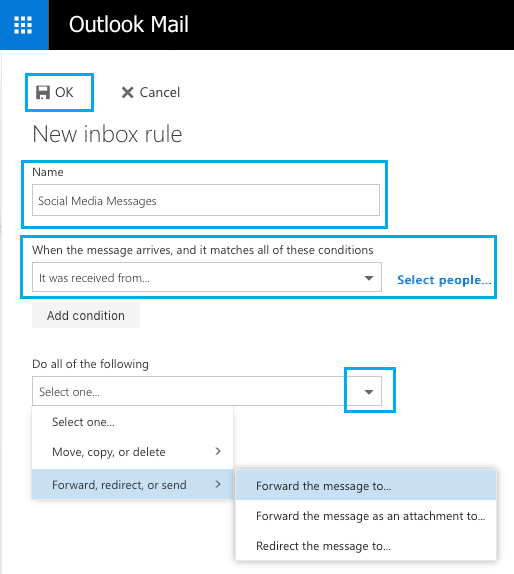
3. On the next screen, enter a descriptive Name for the New Inbox Rule and start configuring your Inbox Rule for forwarding emails from your current Outlook Mail Account to another Email Address.

As you can see in the above image, When the message arrives section allows you to set the criteria or the condition for the message to be selected for forwarding.
4. Once you are done with setting up selection criteria, you can move to Do all of the following section and specify what you want Outlook to do with Emails that match the selection Criteria.
Simply, click on the down arrow in each of the above sections and you will get to choose from various selection criteria and various types of actions for messages matching the selected criteria.