If the File Explorer is not working on your computer, you won’t be able to access Files, Folder and attached USB & External Hard Drives attached to on your computer.
The reason for File Explorer not responding or not working on a Windows computer could be due to the Explorer process being stuck, explorer cache being corrupted or due File Explorer related system files being damaged.
File Explorer Not Responding in Windows 10/11
In many cases, the problem of File Explorer not responding on a Windows computer can be fixed by restarting File Explorer using Task Manager.
If this does not help, you should be able to fix the problem using other troubleshooting steps as provided below in this guide.
1. End File Explorer Task and Restart
Follow the steps below to end the File Explorer process and restart it back again.
1. Open the Task Manager on your computer.
2. Right-click on Windows Explorer entry under “Process tab” and click on End Task.

3. Next, click on the File tab and select Run New Task option in the menu that appears.

4. Type explorer.exe in the Run Command window and click on OK.

After this, try to use the File Explorer and see if it is now working properly.
2. Install Updates
Sometimes, the problem is due to a Windows Update waiting to be installed on the computer.
1. Open Settings on your computer.
2. Click on Windows Update in the left-pane. In the right-pane, click on Check for Updates button.

Allow Windows to check for updates and follow the instructions to download and Install Updates (If available).
Windows 10: Go to Settings > Update & Security > select Windows Update in the left pane and click on Check For Updates button.
3. Clear File Explorer Cache
As mentioned above, the problem could be due to damaged or corrupted file in the File Explorer Cache.
1. Type Control Panel in the Search bar > click on Control Panel App in the search results.

2. On the Control Panel screen, switch to Large Icons view and click on File Explorer Options.

3. On File Explorer Options screen, switch to General tab and click on the Clear button.

4. Click on OK and try to use the File Explorer.
4. Use System Maintenance Troubleshooter
The System Maintenance Troubleshooter as available in Control Panel might help in fixing the problem.
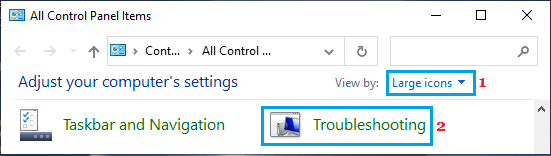
1. Open the Control Panel on your computer.
2. On the Control Panel screen, switch to Large Icons view and click on Troubleshooting.
3. On Troubleshooting screen, click on Run Maintenance Tasks option.

4. Follow the instructions to complete the process.
Once the process is completed, try to use the File Explorer and see if it is now working properly.
5. Repair System Files Using SFC & DISM
In rare cases, the problem could be due to the System Files becoming damaged or corrupted on your computer.
For the steps to repair system files using SFC & DISM tools, you can refer to this guide: How to Repair Corrupted System Files In Windows 11/10.