In case of Shared Files, Microsoft Excel is known to come up with “File is Locked for Editing by another User” error message, both when the File is actually being used by another user and also if it has been left open by another user on the network.
If you are not Sharing the file with anyone and see “File is Locked for editing by another user” message, the problem is usually due to the File not being properly closed.
Excel File is Locked for Editing By Another User
If you are unable to open or edit an Excel file due to “File is locked for editing by another user” error, you can find below the steps to fix this well known issue in Microsoft Excel.
1. Excel File is Locked for Editing By Another User – Single Owner Case
When you open an Excel file, Microsoft Office creates a temporary ownership file and automatically deletes this file as soon as you close the Excel File.
However, sometimes the file does not close properly and the temporary ownership file remains in memory, leading to “File in Use and File is Locked for editing” error in Excel.
The fix for this issue is to locate the temporary ownership file and delete this temporary file from the computer.
1. Open the File Explorer on your computer.
2. On the File Explorer screen, navigate to Location of the temporary ownership file having name ~$<filename> and delete the file.
For example, if the Excel file that you want to open is example.xls, you will find a temporary ownership file having the name ~$example.com.
Once you delete the temporary ownership file, you will be able to open the File, without encountering “File is Locked for editing by another user” message.
2. Shared Excel File is Locked for Editing By Another User
If you are getting “File is Locked for Editing by another user” message in the case of a Shared File, you can ask the other User to close the File or use the co-authoring feature in Excel.
However, if the other User that has left the File open is not unavailable, you can follow the steps below to remotely close the file.
Note: You need to have Admin access to the server where the Excel file resides, in order to be able to remotely close open files on a network.
1. Note down the File Name and the Path to Locked Excel File.
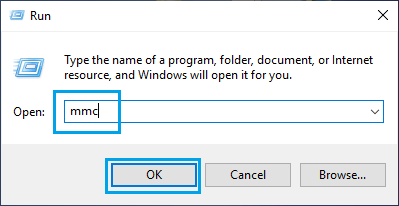
2. Open Run Command > Type mmc and click on OK to bring up Microsoft Management Console.
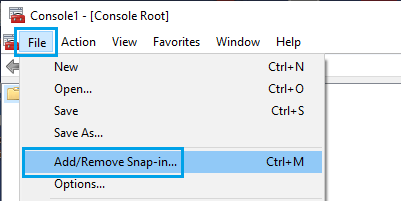
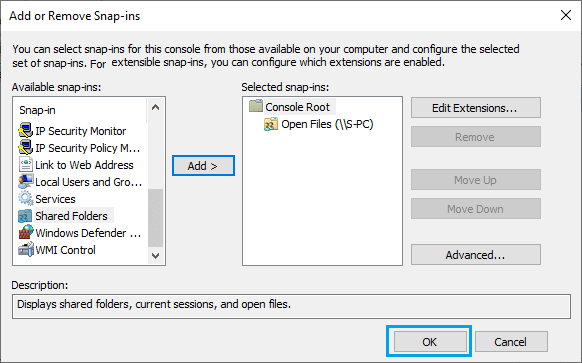
3. On the next screen, click on File > Add/Remove Snap-in.
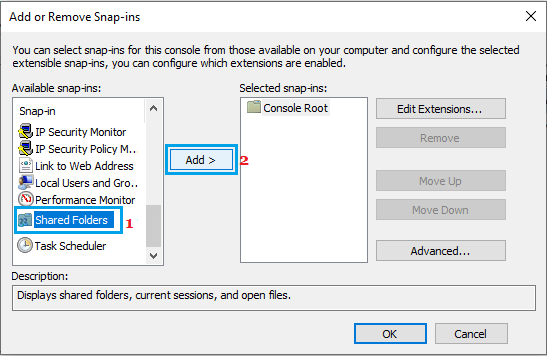
4. On Add or Remove Snap-ins screen, select Shared Folders and click on the Add button.
5. On the next screen, select Another computer and click on the Browse button to locate the other computer on which the Excel File resides.
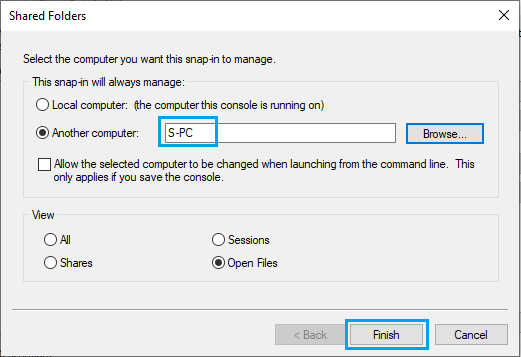
Once you find the Other computer, select the Open Files option and click on the Finish button (See above image).
6. Back on the Add or Remove Snap-ins screen, click on OK to Add the Snap-in to manage Shared Files on another computer.
7. On the next screen, expand the list of Open Files > right-click on the Locked Excel File and click on Close Open File option.

Once you are able to remotely close the open Excel file, the other user will be removed from the File and you will be able to open the locked Excel file and make changes to it.