It can be quite annoying to see Google Chrome browser coming up with “Err Connection Timed Out” error code, just when you are trying to access an interesting website on your computer.
The meaning of this error code is that your request to reach the website or webpage was timed out, because the website took longer than usual time to respond to your request.
There could be various reason for the “Connection Timed out” error on your compuer, ranging from the DNS servers of your service provider being busy to the browser cache being corrupted and other issues.
Err_Connection_Timed_Out Error in Chrome
You should be able to fix “Connection Timed Out” error by Google Chrome browser on your computer using the following troubleshooting steps.
1. Clear Chrome Browser Cache
Start be clearing the Chrome browser cache to rule out the possibility of this problem being caused due to corrupted cache or a cached error page.
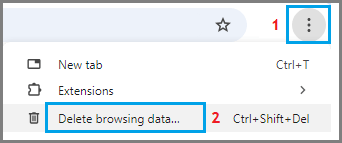
1. Open the Chrome browser on your compurer > Select 3-dots menu icon and click on Delete Browsing Data option in the menu that appears.
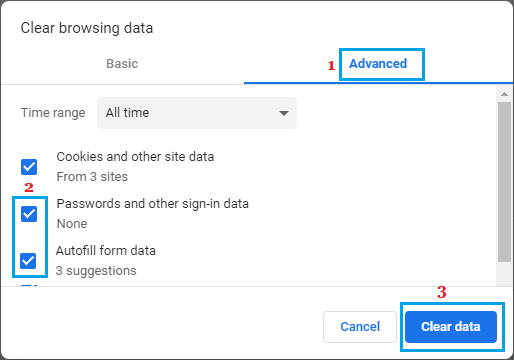
2. On Clear browsing data screen, go to Advanced tab > select the Time Range as All Time and click on Clear Data button.
After this, re-launch the Chrome browser on your computer and see if it is still coming up with Err_Connection_Timed_Out error.
2. Disable Proxy Settings
The problem could be due your computer being configured to connect to internet using Proxy Settings.
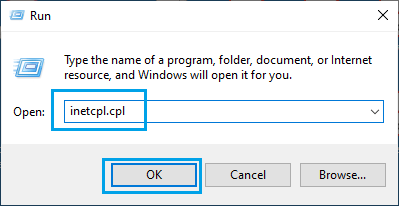
1. Open Run Command (press Windows + R keys).
2. Type inetcpl.cpl and click on OK.
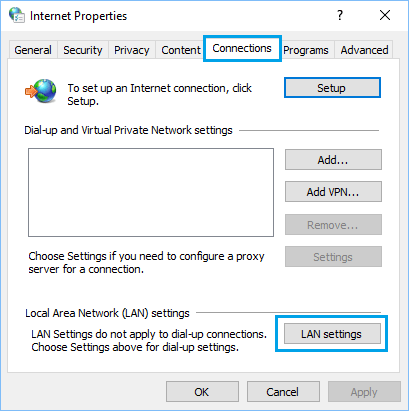
3. On the next screen, go to Connections tab and click on LAN Settings button.
4. On next screen, select Automatically detect settings option and uncheck Use a Proxy server for your LAN option.
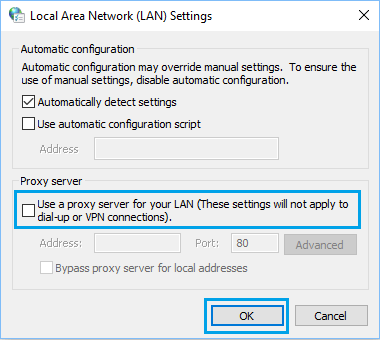
5. Make sure to click OK to save this setting on your computer.
3. Disable IPv6
Users have reported fixing Err_Connection_Timed_Out error in Chrome by disabling IPv6 protocol.
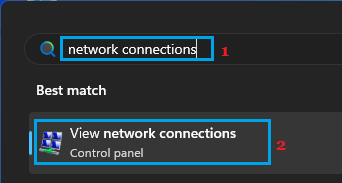
1. Type Network Connections in Windows Search bar > click on View Network Connections in the search results.
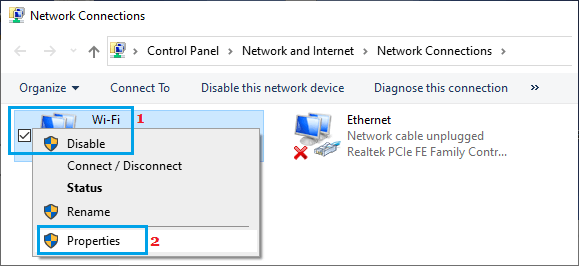
2. On the next screen, right-click on your Wi-Fi Network and click on Properties.
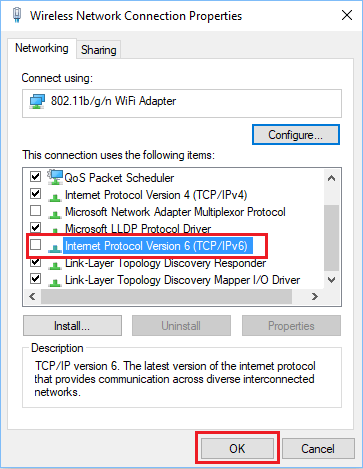
3. On Wi-Fi properties screen, disable Internet Protocol Version 6 (TCP/IPv6) and click on OK to save this setting on your computer.
4. After disabling IPv6, Restart the computer and try to access the internet.
4. Reset Chrome Browser
Resetting Google Chrome to its original factory default settings might help in fixing the problem.
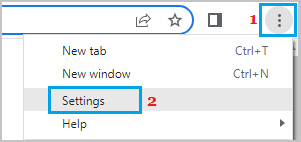
1. Open Google Chrome > click on 3-dots icon > select Settings in the drop-down menu.
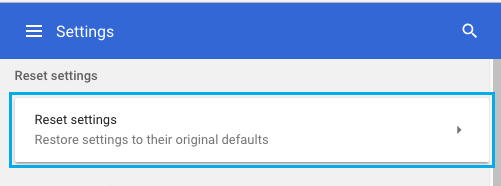
2. On Chrome Settings screen, select Reset Settings in the left-pane. In the right-pane, click on Restore Settings tab.
3. On the pop-up, click on Reset Settings button to confirm.
After the browser is reset, try to access the internet on your computer.
5. Change DNS Server
As mentioned above, the problem could be due to the DNS servers of your Internet service provider being busy or going through problems.
In such cases, you can consider switching to Google’s Public DNS service or other free Public DNS providers like OpenDNS and Cloudflare.
You can refer to this guide: How to Change DNS Server in Windows 11/10 for the exact steps to change the DNS servers on your computer.
6. Reinstall Chrome Browser
If above steps did not help, it is possible that the installation of Google Chrome browser has become damaged or corrupted on your computer.
This can be easily fixed by deleting and reinstalling the Google Chrome browser on your computer by using easy to follow steps as provided in this guide: How to Reinstall Google Chrome on PC and Mac.