If you need to access BIOS or UEFI Settings on your computer, you can find below different methods to Enter BIOS in Windows 11.
Enter BIOS in Windows 11
If you are already logged-in to the computer, you can enter BIOS from the Startup menu, Settings menu and also by using Command Prompt.
If you are not logged-in to your users account, you can enter BIOS by using the Power Icon located at the bottom-right corner of the Login screen.
If the computer is going through problems and not booting up, you can enter BIOS by using a Bootable Windows 11 USB drive.
1. Enter BIOS from the Login Screen
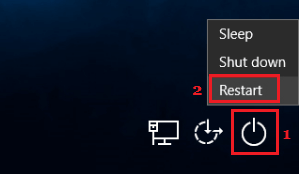
If you are not logged-in, you can enter BIOS by clicking on the Power Icon located at bottom-right corner of the login screen.
1. Start the computer by pressing the Power Button.
2. At the Login screen, click on the Power icon (bottom-right corner) > Press and hold the Shift Key on the keyboard of your computer and click on the Restart option.
3. From the next screen, navigate to Troubleshoot > Advanced options > UEFI Firmware Settings.
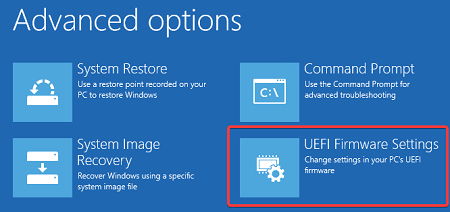
4. On the next screen, click on Restart to enter UEFI Firmware settings on your computer.
Note: If the Power Icon is not visible, click anywhere on the login screen and you will be able to see the Power Icon at bottom-right corner of the screen.
2. Enter BIOS Using the Start Menu
If you are already logged into your User Account, you can enter BIOS by accessing the Advanced Startup Options screen.
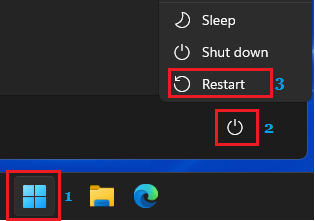
1. Click on Start (1) button > Power Icon (2) > press and hold the Shift key on the keyboard of your computer and click on Restart (3) option.
2. From the next screen, navigate to Troubleshoot > Advanced options > UEFI Firmware Settings.

3. On the next screen, click on Restart to enter UEFI Firmware settings on your computer.
4. Enter BIOS Using Settings
You can also enter BIOS by going to the Settings screen on your computer.
1. Go to Settings > select System in the left-pane. In the right-pane, scroll down and click on the Recovery tab.
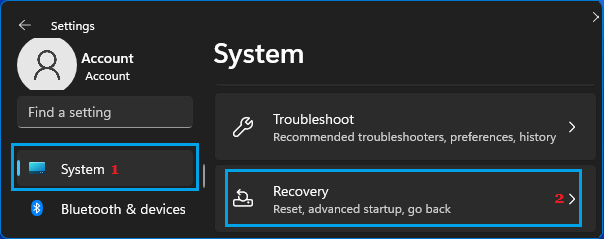
2. On the next screen, scroll down and click on Restart now button located in “Advanced Startup” section.

3. On the confirmation pop-up, click on Restart now button.

4. When the computer restarts, navigate to Troubleshoot > Advanced options > UEFI Firmware Settings option.

5. On the next screen, click on Restart to enter UEFI Firmware settings on your computer.
3. Enter BIOS Using Bootable USB Drive
If your computer is not booting up, you will be needing a Bootable USB Drive to enter BIOS.
1. Insert Bootable USB Drive into USB port of your computer and Press the Power button to start the computer.
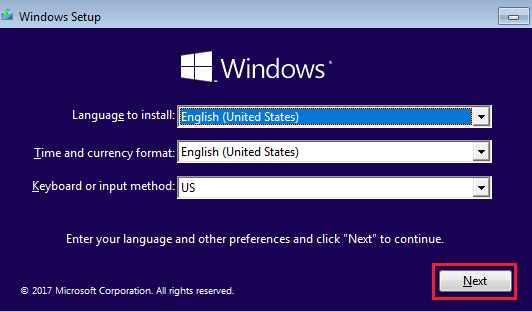
2. Once the computer starts, click the Next button.
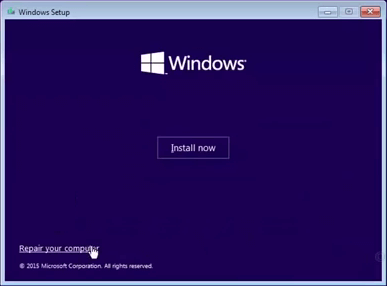
3. On the next screen, click on Repair your computer option, located at the bottom-left corner of your screen.
4. From the next screen, navigate to Troubleshoot > Advanced options > UEFI Firmware Settings option.

5. On the next screen, click on Restart to enter UEFI Firmware settings on your computer.
4. Enter BIOS Using Command Prompt
As mentioned above, you can also enter BIOS in Windows 11 using Command Prompt.
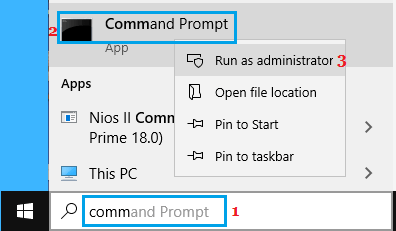
1. Type CMD or Comm in the Search bar > right-click on Command Prompt in the search results and select Run as Administrator option.
2. On the Command Prompt screen, type shutdown /r /o /f /t 00 and press the Enter key on the keyboard of your computer.

3. After your computer restarts, navigate to Troubleshoot > Advanced options > UEFI Firmware Settings option.

4. On the next screen, click on Restart to enter UEFI Firmware settings on your computer.