While the default setting on computers is to Boot from the hard drive, where the operating system is located, they also provide the option to Boot up from USB Drive.
This setup allows you to Boot the computer using a Bootable Windows USB drive, if it is going through problems or is unable to start normally by booting up from the Hard Drive.
If your computer is unable to boot from USB Drive, it usually means that the option to boot up from USB Drive has not been enabled on your computer.
In such cases, you can enable the USB Drive boot option on your computer by going to the BIOS settings on your computer.
Steps to Enable USB Drive Boot in BIOS
If your computer is unable to Boot from USB drive, you can follow the steps below to eable the USB Drive Boot option on your computer.
1. Restart the computer and watch the screen for instructions on which key to press for getting into the boot device selection menu or the BIOS settings on your computer.
The screen messages will say something like Press [XXX Key] to Enter Setup or BIOS SETUP.
Note: You will only have a few seconds to read the instructions. You can reboot the computer again, in case you missed the opportunity to read the instructions properly.
2. Restart the Computer and press the suggested key to enter BIOS Settings
Note: You may need to press the suggested key more than once to enter BIOS. You should not hold down the key (just press and release the key). Also, do not press the key too many times, as you may end up locking the system or generating system errors.
3. Once you are in BIOS, go to the Boot tab and use the suggested keys to make your computer boot from USB Drive first in the Boot sequence order.
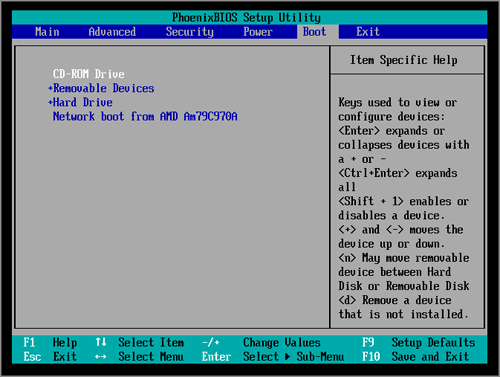
Note: In general, the USB boot option is listed as Removable Devices or USB. However, on some computers USB boot option may be listed under Hard Drive section.
4. Press the F10 key to save the changes and exit from BIOS utility.
After this, your computer should be able to boot from the USB drive.