Apple ID contains your personal information like Address, Phone Number and Credit Card Details which can be misused if your Apple ID Password gets compromised. Hence, may want to Enable Two-Factor Authentication for Apple ID and Add an extra layer of security.
What is Two-Factor Authentication for Apple ID?
Two-Factor Authentication for Apple ID was first introduced by Apple in 2015 for iPhone, iPad and MacBook.
When you enable Two-Factor Authentication for Apple ID, anyone trying to login to your Apple Account with a stolen or guessed password won’t be able to gain access to your Apple Account, without entering a verification code.
This should make it harder for anyone to gain unauthorized access to your Apple Account, considering that one-time verification code is generated instantly by Apple and is only sent to your Phone Number.
Difference Between Two-Factor Authentication and Two-Step Verification
A major difference between Two-Step Verification and Two-Factor Authentication is the location feature that Apple has introduced for Two-Factor Authentication.
In Two-Factor Authentication, you will be shown a map indicating the precise location of the device from which your Apple Account is being logged-in.
After taking a look at the location map, you can select to receive the Verification Code on your phone, or select the option to block the code.
As you may agree, this setup is more useful compared to Two-Step Verification which simply sent a four-digit verification code to your Phone Number and did not provide the option to block verification code.
Another difference between Two-Factor Authentication and Two-Step Verification is the removal of Recovery key in Two-Factor Authentication.
Instead of using a Recovery Key, you are now required to make use of Apple’s online Request Account Recovery feature in order to regain access to your Account, if you end up forgetting the Password for your Apple ID.
Two-Factor Authentication Works only on Apple Devices
Unlike Two-Step Verification, you cannot enable Two-Factor Authentication on your Windows Computer, Chromebook Android Phone or any other non-Apple device.
Also, you need to disable Two-Step Verification, before being able to setup Two-Factor Authentication for your Apple ID. You cannot have both Two-Step verification and Two-Factor Authentication protecting your Apple Account at the same time.
1. Enable Two-Factor Authentication on iPhone, iPad and iPod
Follow the steps below to enable Two-Factor Authentication for iPhone, iPad or iPod running iOS 9 or later versions.
1. Open Settings > tap on your Apple ID Name.
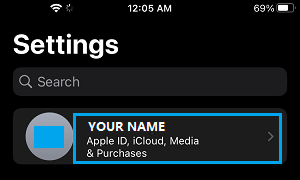
2. Go to Password & Security > tap on Setup Two-Factor Authentication… link.
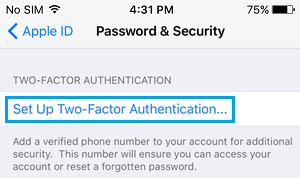
3. Enter your Apple ID Password > Answer 2 Security questions and tap on Next.
4. On the next screen, enter your Phone Number, select Text Message or Phone Call option to receive the verification code and tap on Next.
5. On the next screen, enter the Verification Code that you received from Apple and wait for the verification process to be completed (few seconds).
Once the identification process is completed, Two-Factor Authentication will be setup for the Apple Account on your iPhone.
From now on, whenever you sign into your Apple Account from an unknown device, you will receive a verification code on your Phone Number, along with a map indicating the precise location from where your Apple Account is being accessed.
2. Enable Two-Factor Authentication on Mac
You can Enable Two-Factor Authentication for Apple ID on Mac running Mac OS X El Captain or later versions.
1. Click on Apple logo in top-menu bar and select System Preferences in the drop-down menu.
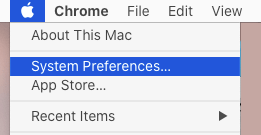
2. On the next screen, click on Apple ID tab > select Password & Security tab in the left-pane and click on the Turn on button, located next to Two-factor authentication entry.
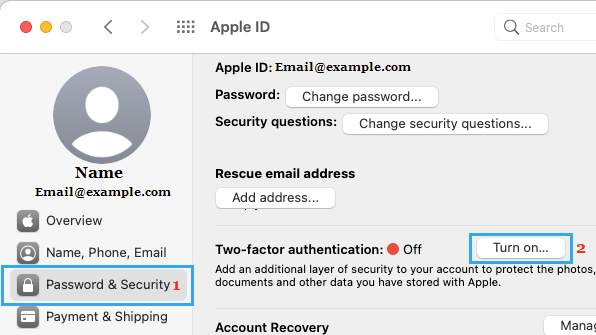
3. Enter your Apple ID Password > Enter Phone Number, select Text Message or Phone Call option to receive the Security Code and click on Continue.
4. On the next two screen, verify your identity by answering 2 Security Questions. On the next screen, enter the Verification Code that you have received from Apple on your phone number and click on Continue.
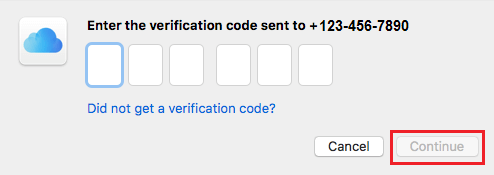
Once the identification process is completed, Two-Factor Authentication will be setup for the Apple Account on your Mac.
3. Disable Two-Factor Authentication on iPhone and Mac
If you do not like Two-Factor Authentication, you can easily disable Two-Factor Authentication for your Apple Account by using iPhone or Mac.
1. On your iPhone or Mac, visit appleid.apple.com.
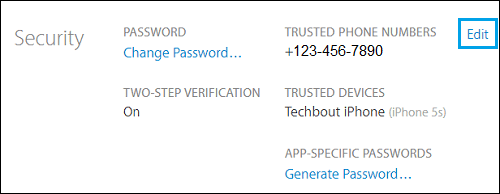
2. On the next screen, locate the Security section and click on the Edit link (See image below).
3. Next, locate the Two-Factor Authentication section and click on Turn Off Two-Factor Authentication link.

4. On the next screen, once again click on Turn Off Two-Factor Authentication, to confirm that you do want to turn off the feature.
5. On the next screen, you will be required to answer security questions and click on Continue.
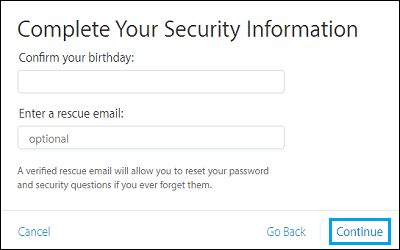
6. Next, you may be asked to confirm your Date of Birth, provide Recovery Email (in case you have one) and tap on Continue to finish the process of disabling Two-Factor Authentication for your Apple ID.
Disable Two-Step Verification
As mentioned above, you need to Disable Two-Step Verification for Apple ID (in case you have it enabled) by following the steps below.
1. On your computer visit appleid.apple.com and sign into your Apple Account.
2. On the next screen, locate the Security section and click on the Edit link (See image below)

3. Next, click on Turn Off Two-Step Verification, located under the sub-heading two-step verification.

4. You will see a pop-up, once again click on Turn Off Two-Step Verification.
5. On the next screen, you will be required to answer Security questions, confirm your Date of birth and Recovery email.