The default setting on a Windows computer is to make the computer to automatically go into Sleep Mode after 15 Minutes of inactivity, while using battery and after 30 minutes of inactivity, when pugged-in to a power source.
While this default Sleep Mode setting is good enough for most users, it may not be suitable for all users in all types of conditions or situations.
Hence, Windows operating system provides the option to increase or decrease the Sleep Mode time and also the option to keep your device always awake by disabling Sleep Mode.
Enable/Disable Sleep Mode in Windows 11/10
If you are looking for a way to disable Sleep Mode on your computer, it is most likely that you want to prevent the computer from going into sleep, only when it is plugged-in or connected to a power source.
Disabling Sleep Mode when the computer is running on battery power can lead to a considerable reduction in the Battery Life of your computer and is not recommended.
1. Disable Sleep Mode When Plugged-in
You can make your computer to stay awake and always be ready for your immediate use by disabling Sleep Mode.
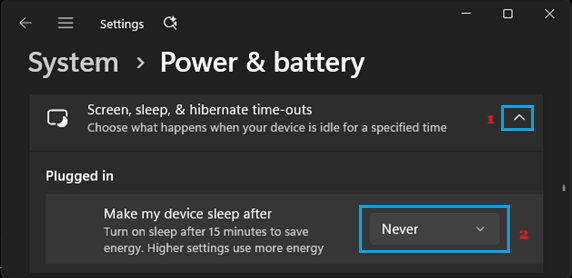
1. Go to Settings > System > Power & Battery.
2. On the next screen, click on Screen, sleep & hibernate time-outs > Select the Never option for “Make my Device sleep after” entry in the “Plugged-in” section.
Windows 10: Go to Settings > System > Power & Sleep (left pane) > set ‘When Plugged in’ setting to Never.
2. Enable Sleep Mode When Using Battery
As mentioned above, you can extend the Battery Life of your Laptop computer by enabling the recommended sleep mode settings, when it is running on Battery power.
1. Go to Settings > System > Power & Battery.
2. On the next screen, click on Screen, sleep & hibernate time-outs > scroll down to “On Battery” section and select 10 minutes (Recommended) setting for “Make my Device sleep after” entry.

This will make your device to automatically go into Sleep Mode, if it remains unused for a period of 10 minutes.
2. Disable Sleep Mode Using Advanced Power Plan Settings
Another way to change or disable the Sleep Mode setting on a Windows computer is by using Advanced Power Settings.
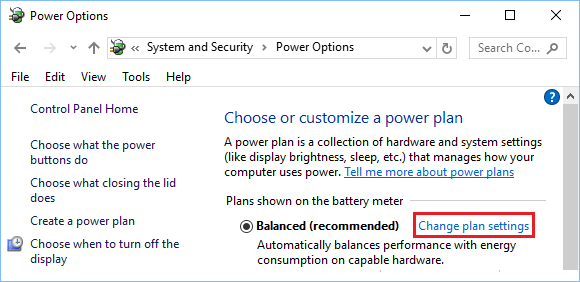
1. Press Win + R keys > Type powercfg.cpl and click on OK.

2. On Power Options screen, click on Change Plan Settings link, located next to the current Power plan setting on your computer.
3. On the next screen, select the Never option for Put the computer to sleep entry in “Plugged-in” section.
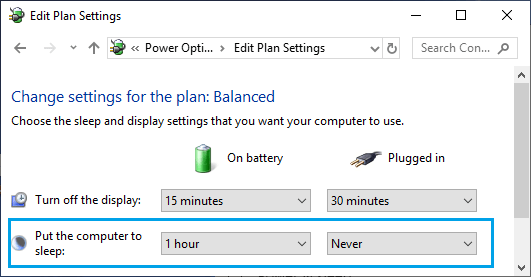
As mentioned above, selecting the “Never” option for On Battery entry is not recommended, as it can lead to loss of Battery Life on your computer.