In case you are not aware, it is possible to setup your Mac to automatically empty the Trash Can, which is ideal for those who allow deleted files to remain forever in the Recycle Bin.
In fact, most users forget to empty the Trash Can on Mac, which often results in deleted files taking up a ton of storage space and causing performance related problems on the computer.
Hence, Apple come up with a solution to this issue in its Mac OS Sierra update by providing Mac Users with the option to Automatically empty the Trash Can after 30 days.
This is a reasonable solution, considering the fact that 30 days is good enough time for most users to discover about deleted files on their Mac and recover those files from the Trash Can.
Automatically Empty Trash Can on Mac
Before going ahead with the steps to automatically empty the Trash Can on your MacBook, you need to be aware that Files removed from the Trash Can are permanently deleted from your computer and they cannot be recovered.
Steps to Automatically Empty the Trash Can On Mac
Follow the steps below to make the Trash Can Automatically empty on your Mac.
1. Click anywhere on the Desktop (empty space) and this will bring up the Finder Icon in the top menu-bar of your Mac.
2. Click on the Finder icon and select Preferences… in the drop-down menu (See image below)

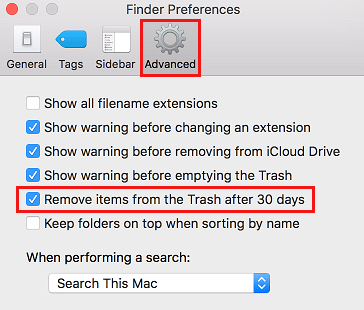
3. On the Finder Preferences screen, switch to Advanced Tab and select Remove items from the Trash after 30 days option.

From now on, whenever you delete a File, Photo or anything else on your Mac, it will be available in the Trash Can for a period of 30 days, after which it is Automatically deleted.