If you do not want to use OneDrive and do not want to be bothered by OneDrive Pop-ups, you can find below the steps to Disable or Uninstall OneDrive from Windows 11 computer.

Disable/Uninstall OneDrive in Windows 11
While Windows 11 provides the option to automatically backup Desktop, Documents/Photos Folders and Microsoft Office Files to OneDrive, there are many users who do not want to save files to OneDrive.
Another category of users who do not want to use OneDrive are those who are already committed to using Google Drive, iCloud, Dropbox and other Cloud storage services.
The solution in such cases is prevent OneDrive from automatically starting on the computer, which practically disables OneDrive. The other soloution is to Uninstall OneDrive from the computer.
1. Disable OneDrive in Windows 10/11
The easiest way to disable OneDrive on a Windows 11 computer is to simply stop OneDrive from starting automatically on the computer.
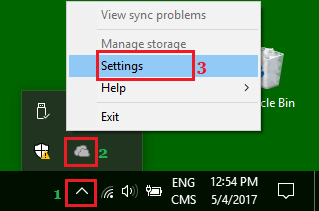
1. Click on the System Tray icon (1) in Taskbar > right-click on OneDrive App icon (2) and select Settings (3) option in the menu that appears.
2. On the next screen, switch to Settings tab and uncheck “Start OneDrive automatically when I Sign in to Windows” option.
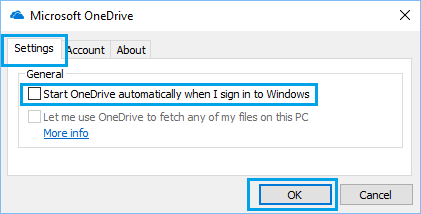
3. Click on OK to save this setting on your computer.
4. Next, click on the System Tray (1) Icon > right-click on the OneDrive Icon (2) and click on Exit (3) to close OneDrive on your computer.
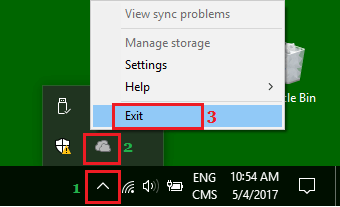
When you Restart or Start your computer the next time, you will no longer find OneDrive starting automatically on your computer.
2. Uninstall OneDrive in Windows 11
If you no longer want to use OneDrive and unlikely to use it in future, you can Uninstall OnDrive from your computer.
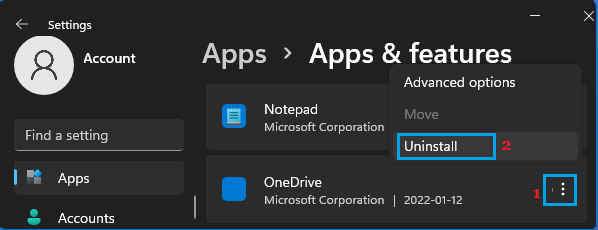
1. Go to Settings > select Apps in the left-pane and click on Apps & Features in the right-pane.
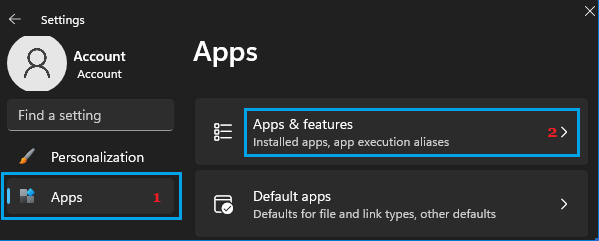
2. On Apps & Features screen, click on 3-dots menu icon next to OneDrive and select Uninstall option in the menu that appears
3. On the confirmation pop-up, click on Uninstall to confirm.

Wait for Windows to Uninstall OneDrive from the computer.