If you are noticing high CPU usage by Software Reporter tool on your computer, you can find below the steps to Disable Chrome Software Reporter Tool in Windows 11/10.

What is Chrome Software Reporter Tool?
The Software Reporter tool is a legitimate part of Google Chrome browser and not a virus or malware program trying to steal data or cause damage on your computer.
The Software Reporter tool gets included or packaged with Google Chrome browser only when you download the Chrome browser on a Windows computer and does not appear to be a part of Google Chrome running on Mac computers.
In most cases, users become aware about the presence of Software Reporter tool on their computer only when Chrome browser comes up with Software Reporter Tool has stopped working error message.
What is the Purpose of Software Reporter Tool?
The main purpose of Software Reporter Tool is to monitor the Chrome browser on your computer for performance related issues due to conflicts with extensions, apps or other programs installed on the computer.
In earlier versions of Chrome (Chrome V110 and earlier) the Software Reporter Tool supported Chrome Cleanup Tool by monitoring the computer for harmful software and unsafe system settings.
However, the Chrome Cleanup Tool was subsequently removed from Chrome V110 and you can longer use Google Chrome to remove harmful programs from a Windows computer.
Where is the Location of Software Reporter Tool in Windows 11/10?
The Software Reporter Tool is located in a subfolder (SwReporter) of the user’s profile folder and it appears as a small (54kb) executable file named as “software_reporter_tool.exe”.
The Software Reporter Tool can be easily accessed by opening the File Explorer on your computer and navigating to SwReporter folder located at the following path: C:/Users/User Account/AppData/Local/Google/Chrome/User Data/SwReporter.
Should You Disable Software Reporter Tool?
The Software Reporter Tool can sometimes consider legitimate browser extensions, apps and programs as being in conflict with the browser and lead to high CPU usage problems on Windows computers.
In such cases, you can reduce the activity of this tool by preventing Google Chrome from running in background and also by disabling the tool.
Since the Software Reporter Tool is not an essential Windows process, it can be disabled (if it is causing problems), without having any adverse impact on the performance of your computer.
1. Prevent Chrome from Running Apps in Background
As mentioned above, you can siginificantly reduce the activity of Software Reporter Tool on your computer by preventing Chrome from allowing apps and extensions from running in the background.
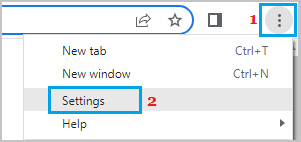
1. Open the Chrome browser, click on the 3-dots Icon and then select Settings from the drop-down menu.
2. On the Settings screen, select System in the left-pane. In the right-pane, disable Continue running background apps when Google Chrome is closed option.
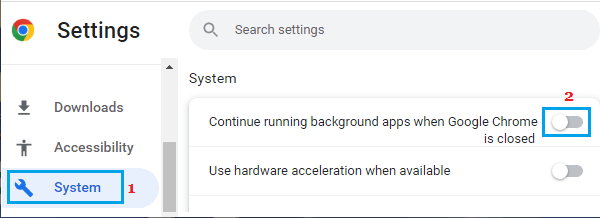
This will prevent the browser from running Chrome processes in the background on your computer.
2. Delete the Software Reporter Tool
As mentioned above, you can delete the Software Reporter Tool from your computer and it won’t lead to any problems or performance related issues on your computer.
1. Open File Explorer > navigate to C:/Users/User Account/AppData/Local/Google/Chrome/User Data/SwReporter.
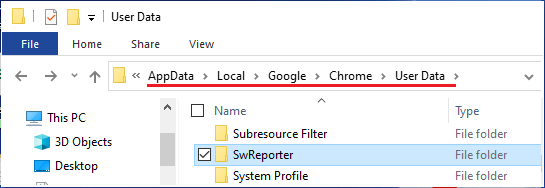
2. In the SwReporter Folder, open the Folder associated with the version of Chrome browser installed on your computer.
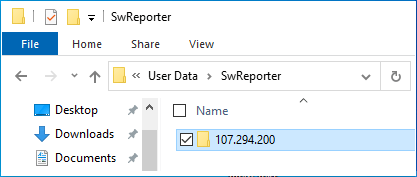
3. In the Folder, right-click on software_reporter_tool.exe > select Rename and Rename the file as software_reporter_tool.txt.
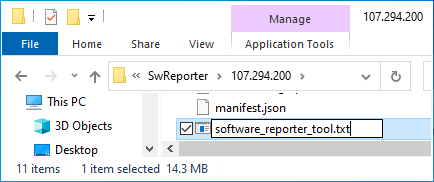
4. On the confirmation pop-up, click on YES to confirm.
After this, Google Chrome won’t be able to use the Software Reporter Tool executable file on your computer.
However, you need to be aware that Chrome will re-download the Software Reporter Tool, whenever it updates the browser and you will have to rename the file once again.
3. Disable Software Reporter Tool using Registry Editor
You can also permanently disable Software Reporter Tool on your Windows 11/10 computer by using Registry Editor.
1. Right-click on the Start button and click on Run. In the Run Command window, type regedit and click on OK.
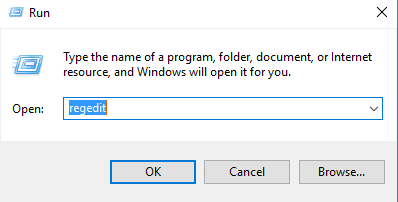
2. On the Registry screen, navigate to HKEY_LOCAL_MACHINE\SOFTWARE\Policies and see if Google Key is available in the Policies Folder.
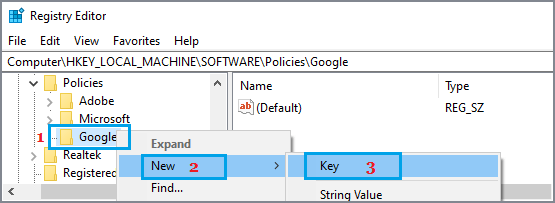
If it is not, right-click on Policies and select New > Key and rename the new key as Google.

3. Next, right-click on Google > select New > Key and rename the new key as Chrome.
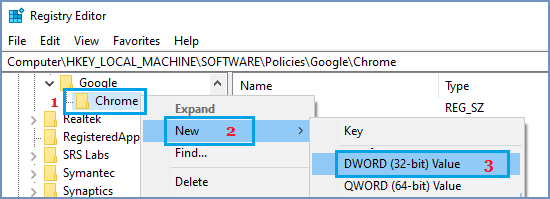
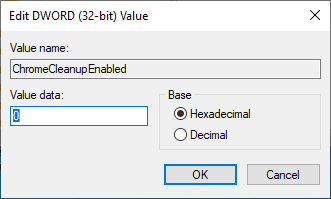
4. After this, right-click on Chrome > select New > DWORD (32-bit) Value and name the new value as ChromeCleanupEnabled.
5. Double-click on the newly created ChromeCleanupEnabled DWORD. On the Edit DWORD pop-up, set the Value data to 0 and click on OK.
6. Close Registry Editor and Restart the Chrome browser.