If your iPhone is lost or stolen, there is always the possibility of your Apple Pay account being used to make unauthorized purchases. Hence, it is a good idea to disable Apple Pay and even erase the data from your lost or stolen iPhone.
If you are only concerned about your Apple Pay account being misused, you can disable Apple Pay by removing the Credit Card linked to your Apple Pay Account.
If you are also concerned about your personal data & photos being misused, you can remotely erase all the data from your iPhone by logging into your iCloud Account on a Mac or Windows computer.
Disable Apple Pay When iPhone is Lost
If you end up with a misplaced, lost or stolen iPhone, you can find below the steps to disable Apple Pay and also the steps to remotely erase the data from your iPhone.
1. Remove Credit Cards Linked to Apple Pay Using Mac
If you are using a MacBook, you can remove credit cards linked to Apple Pay by going to app store on your Mac.
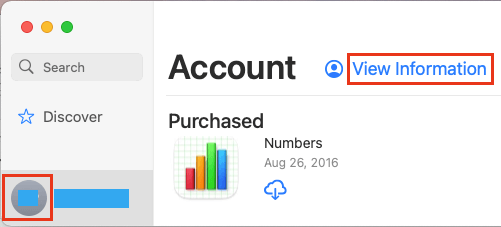
1. Open the App Store on your Mac > click on your Name or the Sign In button located at bottom-left corner.

2. If prompted, sign-in to App Store using your Apple ID and Passcode. Once you are Signed-in, click on your Profile Icon (bottom-left) and select View Information option.

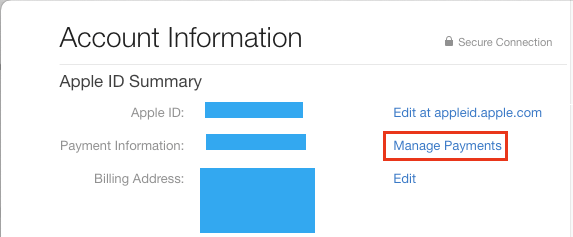
3. On Account Information screen, click on Manage Payments option listed in “Apple ID Summary” section.

4. On the next screen, select the Edit option located next to your Payment Method.

5. On the next screen, click on Remove to remove your credit card information from your Apple ID.
2. Remove Credit Card Details from Apple ID Website
You can also remove credit card linked to Apple Pay by going to Apple ID website and logging into your Apple ID account on a Windows computer.
1. Go to Apple ID website and Sign-in to your Apple ID Account by entering your Apple ID and Password.
2. Once you are signed-in, you may be prompted to answer two security questions.
3. On Apple ID screen, click on Payment Methods in the left-pane,
4. On Payment Methods screen, click on the Edit option located next to your Credit Card.
5. On the next screen, click on Remove to remove your Credit Card Information from Apple ID.
3. Remotely Erase Apple Pay & Data from iPhone
If you are also concerned about your photos and personal data being misused, you can remotely erase all the data from your device by going to your iCloud Account on a Mac or Windows computer.
For the actual steps to remotely erase all the data from your iPhone, you can refer to this guide: How to Remotely Erase Data From Lost iPhone.