If you are frequently experiencing slow browsing speeds, the problem might be related to crowded DNS Servers of your service provider. You will find below the steps to Change DNS Servers on iPhone or iPad.
Change DNS Servers on iPhone and iPad
As indicated above, the slow speed of the WiFi Network on your iPhone or iPad could be due to crowded and slow DNS Servers provided by your Internet Service Provider.
Hence, switching too faster and free to use DNS servers as provided by Google or OpenDNS can help in fixing this problem.
Before going ahead with the steps to change DNS servers on iPhone, you need to be aware of the following.
1. DNS Servers on iPhone can only be changed for WiFi Network. There is no provision in iOS to change the DNS servers for Cellular Network.
2. There is no Global option in iOS to change the DNS for all the WiFi Networks on your iPhone.
3. The changes that you make to DNS Servers on iPhone are network specific and do not change the properties of other networks on iPhone.
For example, if you are using WiFi Network A at home and WiFi Network B at your place of work, making change to A Network will have no impact on Network B.
In above case, you will need to change DNS servers separately for Home and Office Networks.
3. Once you change DNS servers for a particular network, your iPhone will remember the settings and use the same DNS settings, every time you connect to that particular Network.
Steps to Change DNS Servers on iPhone and iPad
Follow the steps below to switch from Service Providers DNS Servers to Google DNS on your iPhone.
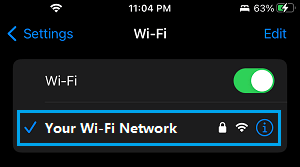
1. Go to Settings > Wi-Fi > tap on your Wi-Fi Network.
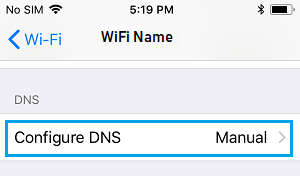
2. On Wi-Fi Name screen, scroll down and tap on Configure DNS option.
3. On the next screen, select the Manual option and tap on Add Server.
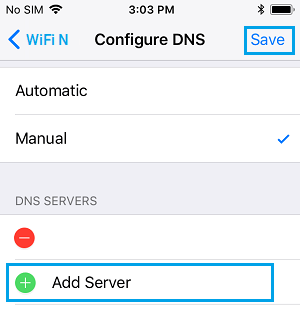
4. Type 8.8.8.8 as the New DNS Server address and tap on Save.
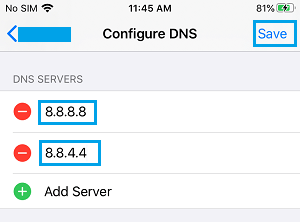
5. Similarly, add 8.8.4.4 as another Google DNS Server.
6. After adding Google DNS Servers, you can delete the DNS Servers of your service provider by tapping on the Red Minus icon.
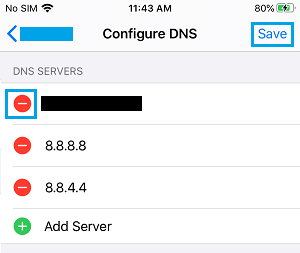
7. Tap on the Save option to save this change on your device.
Note: In case you want to use OpenDNS, enter 208.67.222.222 and 208.67.220.220.
After changing DNS servers on iPhone, you should be able to see an improvement in the browsing speed on your iPhone.