In case you are not aware, it is possible to change the DNS Servers on your Android Phone to faster DNS servers as provided by Google, Amazon and Open DNS.
Changing DNS Servers on your Android Phone or Tablet can be helpful, if you are experiencing connectivity problems on your phone due to the DNS servers of your service provider going through problems or being habitually busy during certain periods of the day.
By default, your Android Phone or Tablet will be using the DNS servers as provided by your internet service provider (ISP).
While it is easy to change the DNS Servers for Wi-Fi Network on your Android Phone, changing the DNS Servers for Cellular or Mobile Network requires Root Access to your device.
Hence, in this article we are focusing on providing you with the steps to change DNS Servers only for the Wi-Fi network.
Steps to Change DNS Servers On Android Phone or Tablet
Follow the steps below to change the DNS Servers on your Android Phone or Tablet. In this case, we will be changing the DNS Servers to Google DNS.
1. Open the Settings App on your Android Phone
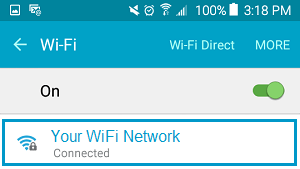
2. From the Settings screen, go to Wi-Fi and tap on your Wi-Fi Network Name.

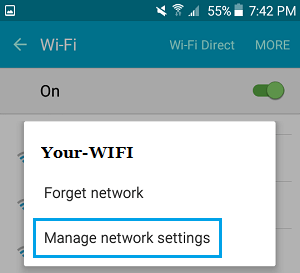
3. On the pop-up that appears, select Manage Network Settings option.

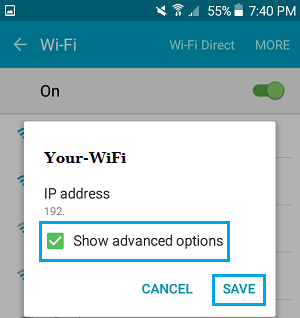
4. On the next popup, tap on Show Advanced options.

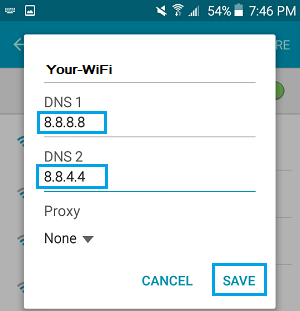
5. On the pop-up, scroll down and change DNS1 entry to 8.8.8.8 and DNS2 entry to 8.8.4.4 and then tap on Save to save this change on your Android phone.

After this, your Android Phone will be using the DNS Servers of Google, which you may find being faster and more reliable than the DNS servers of your Service provider.
Other Popular Free DNS Providers
In the above example, we changed the DNS Servers to Google DNS. You can either go with Google or select from any of the following DNS services, which are also free to use and known to be reliable.
- OpenDNS: DNS 1: 208.67.222.222, DNS 2: 208.67.220.220
- Comodo Secure DNS: DNS 1: 8.26.56.26, DNS 2: 8.20.247.20
- Norton ConnectSafe: DNS 1: 198.153.192.40, DNS 2: 198.153.194.40