While the chances of hard disk failure are greater on older computers, even new computers can fail or crash due to hardware and software related issues.
Hence, Windows computers come equipped with built-in Backup Tools that can be used to backup all your personal files, apps, programs and operating system files.
Backup Windows 11/10 Computer
In general, you can find the following set of Backup & Restore tools on a Windows 11/10 computer.
1. Back Up and Restore: This can be used to backup all your personal files, photos and other data to an External Storage Drive attached to the computer.
2. System Image Backup: Windows Backup and Restore Tool can also be used to create a System Image or Snapshot of your computer, including all your personal Files, Photos, Program and Operating System Files.
3. File History Backup: This can be used to automatically backup all the main folders of your User Account to an external storage drive.
Unlike Backup and Restore, File History does not backup Operating system and Program files. It can only be used for Backing up the Main Folders in a User Account.
Warning: Going by user reports, both File History and System Image Backup can go horribly wrong and lead to loss of files and corrupted USB Storage Drive.
1. Backup Computer Using Backup and Restore
As mentioned above, the backup and Restore Tool can be used to make a complete backup of all files, photos and other type of data available on your computer, including the Operating System and Program files.
You can find the steps to backup your computer using Backup & Restore in this guide: How to Use Backup and Restore in Windows 11/10.
2. Backup Windows Computer Using System Image
The Backup & Restore Tool as available in Windows 11/10 can also used to create a System Image or Snapshot of all Files, Photos, Program and Operating System Files on your computer at any given point of time.
You can find the steps to create a System Image backup of your computer in this guide: How to Create System Image Backup in Windows 11/10.
3. Backup Windows Computer Using File History
As mentioned above, File History can only backup the main User Account Folders to an external storage drive, it does not backup program and System Files.
By default, File History Backup includes Desktop, Documents, Downloads, Music, Pictures, Videos, OneDrive and App Data Folders.
However, you can also add more Folders, Exclude Folders and configure automatic File History Backups as per your own requirements.
You can find the steps to backup the Main User Account Folders on your computer in this guide: How to Backup Files Using File History In Windows 10.
4. Manually Backup Windows Computer
The safest way to backup files on a Windows computer is to organize all your personal files, photos and other data into main User Folders (Documents, Pictures, Downloads, etc.) and drag these folders to USB Storage.
This manual method is a far better option to back up your files, compared to using risky Backup tools like File History and System Image.
5 Backup Windows Computer to Google Drive
Another way to Backup Files on a Windows 11/10 computer is to use the “Backup and Sync” tool as available on Google Drive.
1. Download Backup and Sync tool from Google Drive.
2. Launch Backup and Sync tool on your computer by double-clicking on it.
3. Allow Backup & Restore Tool to prepare your computer for Backup to Google Drive.
4. If you have Google Drive app on your computer, you will be automatically logged into Backup and Sync. If not, click on Get Started button.

5. On the next screen, login to your Gmail Account by entering Gmail User Name and Password and click on Got it to move to the next step.

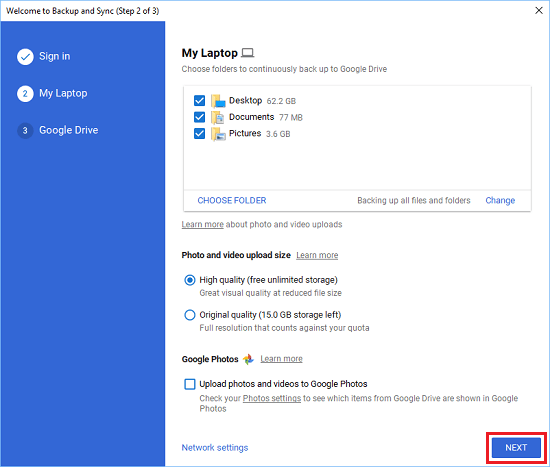
6. On the next screen, click on Next to move to the next screen.

Note: If required, you can Add more Folders by clicking on Choose Folder Link and remove Folders by unchecking them.
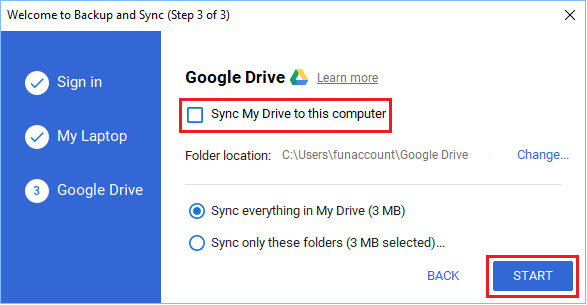
7. On the next screen, uncheck Sync My Drive to this computer option and click on Start.

Note: Selecting Sync My Drive to this computer option makes Google Drive Files available on your computer.