You risk losing all your files, photos and other data, if your MacBook happens to crash due to software or hardware related failure. Hence, it is important that you learn to make a backup of your device.
In this regard, macOS comes with a built-in backup utility known as Time Machine, which can be used to setup both automated and one-time backup of all your MacBook to an external storage drive.
Apart from this, you can Backup your MacBook to Apple’s iCloud storage service, Dropbox, OneDrive, Google Drive and other popular cloud storage services.
1. Manually Backup MacBook to External Storage Drive
The simplest way to backup MacBook is to connect your computer to an external storage drive and simply drag all your photos, files and folders to the connected storage device.
1. Connect the external storage device to MacBook.
2. Open the Finder on your Mac and make sure that the external storage device appears in the side-menu.
3. Once the external storage drive is available in the sidebar, you can drag any file or folder located on desktop to the attached storage device on your MacBook.
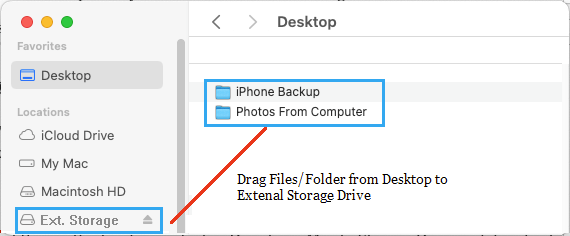
The advantage of this method is its simplicity – Drag from Mac to storage drive and drag back from storage drive to Mac, whenever you want to restore the data back on your device.
2. Use Time Machine to Backup MacBook
The built-in Time Machine utility in macOS can be used to backup MacBook to any connected storage drive and also used to backup MacBook wirelessly to an external drive available on the same network.
While Time Machine can be used to prepare a one-time backup, its use is more justified for setting up a MacBook to be automatically backed up to an external storage device.
Time Machine ensures that the backup on the external storage drive remains continuously updated, as the data on your MacBook changes from day-to-day use.
Note: Going by user experiences, it is better to manually backup photos to iCloud or external storage drive and exclude them from Time Machine backups.
1. Click on Apple Logo in top-menu bar and select System Settings (or System Preferences) in the drop-down menu.
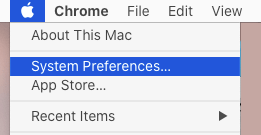
2. On System Preferences screen, click on Time Machine Icon.

3. On Time Machine screen, select backup automatically option (if click on Select Backup Disk… button.
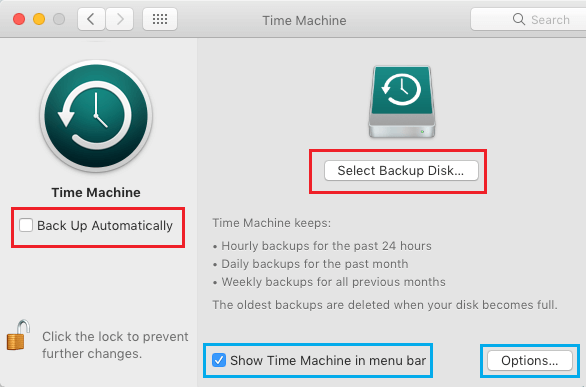
Note: Make sure you select Show Time Machine in menu bar option.
4. On the next screen, select the external Hard Drive connected to your Mac and click on Use Disk button.
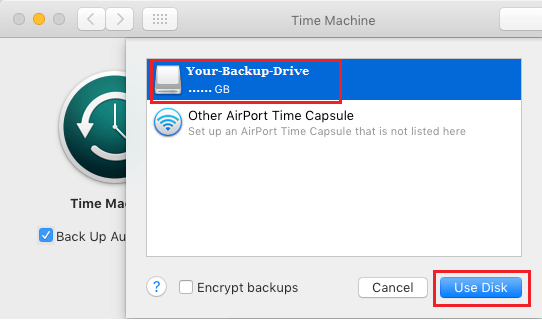
Note: You can select Back Up Automatically option, if you want Time Machine to automatically keep the backup updated.
5. If the Format of attached external hard drive is incompatible with macOS, you will be prompted to Erase the Disk.
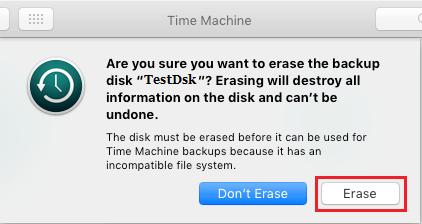
6. Patiently wait for the backup process to be completed.
7. Once the backup is completed, open the Finder on your Mac, right-click on the external storage drive and select the Eject option.
Note: Disconnecting the external drive without ejecting can result in the data on the storage drive being damaged or corrupted.
Note: For automated Time Machine backups, the storage capacity of external drive should at least match the storage capacity of the Hard Drive on your MacBook.
3. Automatically Backup MacBook to iCloud
While Apple provides MacBook users with 5 GB of free iCloud storage space, you can purchase additional amount of iCloud storage space at very competitive rates from Apple.
If you have about 50 GB storage in your iCloud account (0.99/month), you can setup your MacBook to automatically backup all your photos, contacts, calendars, notes and reminders to iCloud.
If you want to, you can also setup all the files on desktop and the documents folder to be automatically backed up to iCloud drive.
1. Click on Apple Logo in top-menu bar and select System Settings (or System Preferences) in the drop-down menu.

2. On the system settings screen, click on Apple ID Icon.
3. On the next screen, select iCloud in the left-pane. In the right-pane, select items that you want to backup to iCloud.
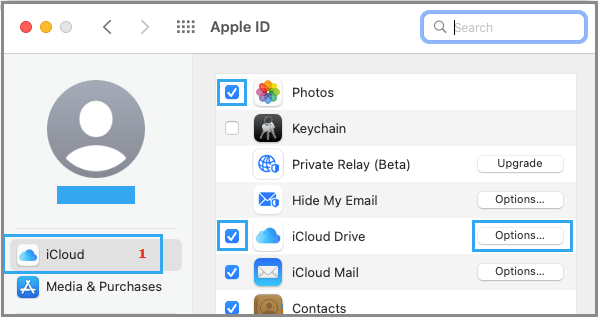
If you want to backup files located on desktop & the documents folder, check the little box next to iCloud Drive and click on the Options button next to it.
4. On the next screen, select Desktop & Documents Folders and click on Done.
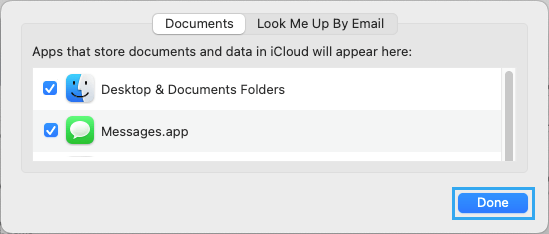
This will ensure that all the files located on the desktop and documents folder on your MacBook are automatically saved to iCloud Drive.
4. Manually Backup MacBook to iCloud Drive
If you do not like the idea of automatically backing up MacBook to iCloud, you can use the Finder on your MacBook to backup selected data to iCloud Drive.
1. Open the Finder on your Mac.
2. On the Finder screen, select iCloud Drive in the left-pane. In the right-pane, select the folders that you want to backup and simply drag them to iCloud Drive tab in the left-pane.

3. Patienty wait for the data to be transferred from your MacBook to iCloud Drive.
The time to back up the selected item will depend on the speed of your internet connection and the amount of data that needs to be transferred from your device.
5. Backup MacBook to Other Cloud Storage Services
Similar to iCloud Drive, other cloud storage services like Google Drive, OneDrive and Dropbox make it easy to backup data from Mac to their cloud storage service.