If you have just bought a printer or shifted from USB to wireless printer, you can find below the steps to add wireless printer in Windows 11.
Add Wireless Printer in Windows 11
If you have just brought home a printer, you need to go through the process of connecting or adding the printer to computer. In general, the procedure to add wireless printers in Windows 11 involves the following steps.
- Setup Printer and connect to Wi-Fi Network.
- Add Wireless or Network Printer to Computer
With this understanding, let us go ahead and take a look at the two steps to add wireless or network printer.
Step #1. Setup Wireless Printer and Connect to Network
Most wireless printers are built to detect Wi-Fi networks and automatically connect to your home or office Wi-Fi network.
1. Switch ON the Printer by pressing the Power button.
2. Next, access Setup Menu on the LCD Panel of the printer.
3. Choose Language, Country, Install Cartridges and Choose your Wi-Fi Network.
4. Enter your Wi-Fi Network Password.
If your printer does not have a LCD screen, you will have to connect the printer to the computer, in order to complete the setup process and connect to Wi-Fi network.
Step #2. Add Wireless Printer to Computer
1. Make sure the printer is switched ON. If it is not, press its Power button and wait for the printer to initialize and join your Wi-Fi network.
2. If the printer is not connected to Wi-Fi network, go to LCD Panel of the Printer > open Settings and select your Wi-Fi Network.
When prompted, enter the Password for your Wi-Fi network and this will connect the printer to Wi-Fi network.
3. On your computer, go to Settings > Devices > select Bluetooth & Devices in the left-pane and click on Printer & Scanners in the right-pane.
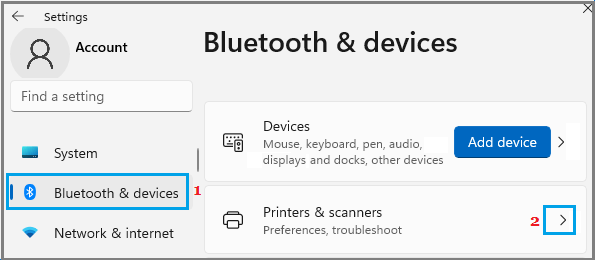
4. On the next screen, your wireless printer may already be listed. If the printer is not listed, click on Add Device button and wait for Windows to scan and locate your printer.
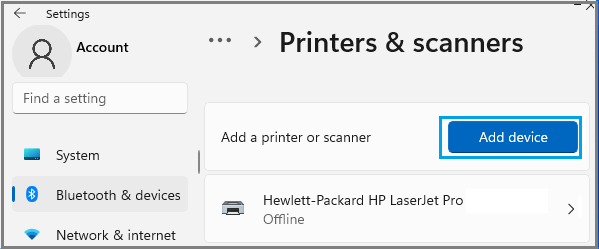
5. Once the Printer is listed, click on the Add Device button located next to your printer.
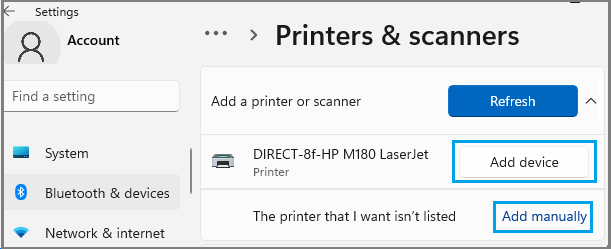
Note: If Windows fails to connect to the printer, click on Add Manually option and follow the instructions to add the printer.
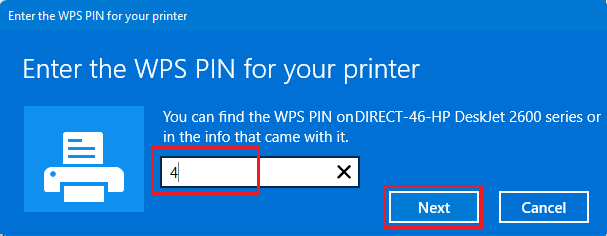
6. On the next screen, enter the WPS PIN for your printer and click on the Next button.
7. Follow the remaining onscreen instructions to complete the setup process.
Note: On certain printers, you may need to first connect the printer to computer via USB and install the printer software on your computer.