Similar to OneDrive and Google Drive, you can upload all types of files, including photos, documents, spreadsheets and presentation files to iCloud Drive as a backup.
Apart from serving as a backup, the advantage of storing files on iCloud Drive is that they can be accessed across multiple devices from anywhere in the world and easily shared with others.
Upload Files to iCloud Drive
All that is required to Upload Files to iCloud Drive is to create an Apple ID, which automatically creates your iCloud Account and provides you with 5 GB of free iCloud Drive storage space.
If you have a ton of files and photos, you can upgrade to 50 GB iCloud Storage for as little as $0.99/month and go up the scale to 200 GB for $2.99/month and 2 TB for $9.99/month.
If you happen to change your mind, you can downgrade to a lower option or even go back to the Free 5 GB option at any time.
With this understanding, let us go ahead and take a look at the steps to Login to iCloud Drive, Create New Folder to upload files on iCloud Drive and Upload Files to iCloud Drive.
1. Login to iCloud Drive
You can Login to iCloud Drive from iPhone, iPad, MacBook, Windows PC or Chromebook by using any web browser to visit icloud.com.
1. Go to iCloud.com and Login to your iCloud Account by entering Apple ID and password.
2. Once you are logged in, click on the Profile Icon and click on the Drive icon to access your iCloud Drive space.
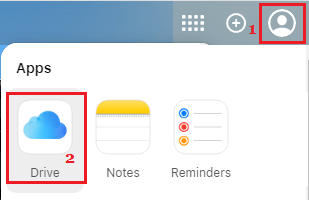
3. If you are logging into iCloud Drive for the first time, you will be landing on an empty screen with No Items to see.

If you switch to Browse tab, you will see Desktop, Documents, Shortcuts and TextEdit Folders automatically created by iCloud Drive.
2. Create New Folder On iCloud Drive
While you can start uploading files to pre-created Documents and Desktop Folders, you can also create a New Folder and give it a relevant name that matches its purpose.
1. Click on the Browse tab in left-pane. In the right-pane, click on the Folder icon in top-menu bar.
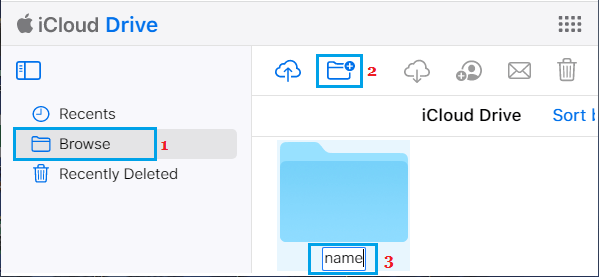
2. Once the Folder is created, type a descriptive Name for the Folder.
3. Upload Files to iCloud Drive
Now that you have created a Folder on iCloud Drive and given it a proper name, you can start uploading files to this folder by following the steps below.
1. Open the Folder on iCloud Drive to which you want to upload files.
2. Once you are in the Folder, click on the Cloud icon in the top-menu bar.

3. On the next screen, navigate to the Location of the File that you want to upload on your computer > select the File and click on the Add button.
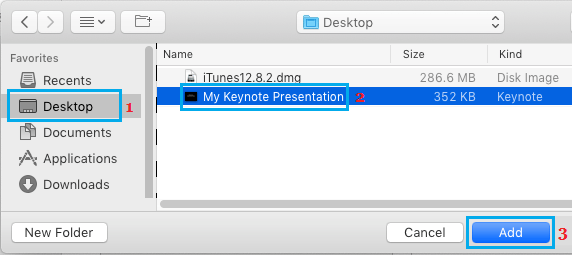
4. If the File is small, it will immediately show up on iCloud Drive. If it is a large file, you will see it uploading to iCloud Drive.
Note: The current size limit of files that you can upload to iCloud Drive is 15 GB or less.
4. How to Delete Files On iCloud Drive
As you start using iCloud Drive, you may find the need to delete Files from iCloud Drive.
1. Open the Folder on iCloud Drive in which the Files that you want to delete are located.
2. Once you are in the Folder, select the Files that you want to delete by clicking on them.
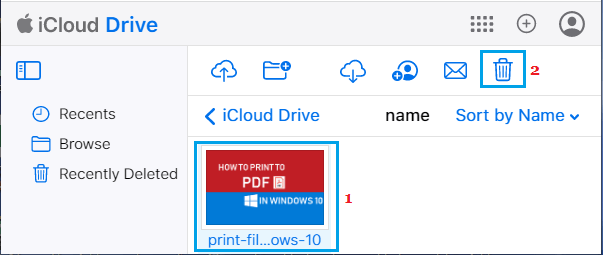
3. Once the Files are selected, click on the Trash icon to delete the selected Files.
5. How to Delete Folders On iCloud Drive
Deleting folders on iCloud Drive is as simple as creating them.
1. Select the Folder that you want to delete by clicking on it.
2. Once the folder is selected, click on the Trash icon to delete the selected folder.
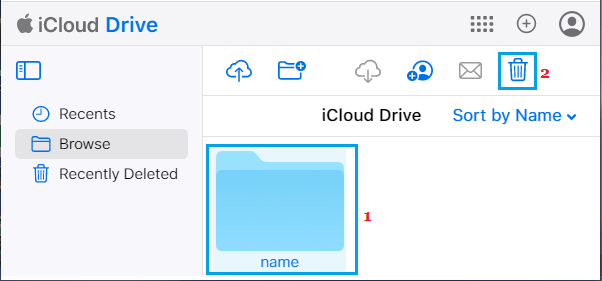
3. You may see a confirmation pop-up, click on the Delete option to confirm.
6. Download Files from iCloud Drive
Follow the steps below to download files from iCloud Drive to your computer.
1. Open the Folder in which Files that want to download are located.
2. Once you are in the Folder, select the Files that you want to download by clicking on them.
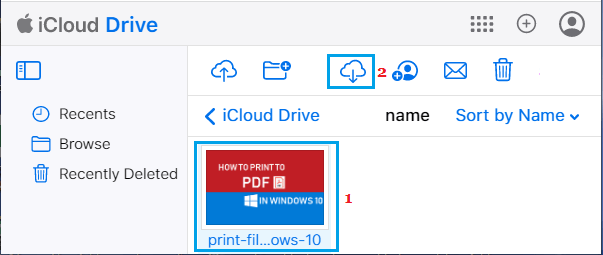
3. Once the Files are selected, click on the Cloud icon to download the selected Files to your computer.